From RedHeart.com
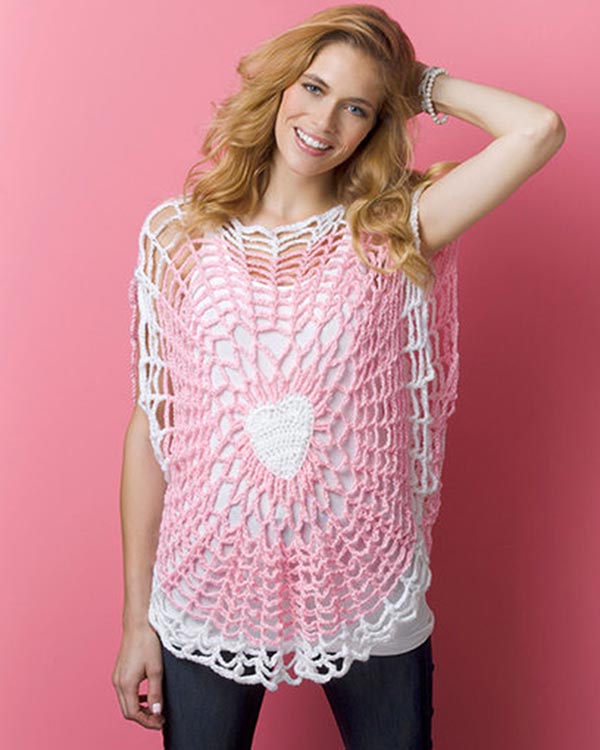
Lighthearted Tunic
LW2810
Skill Level: Easy
RED HEART® “Soft Yarn”: 1 skein each of 6768 Pink A, and 4600 White B.
Crochet Hook: 5mm [US H-8].
Yarn needle, stitch markers.
Adjustable ring Holding the yarn a few inches from the end, wrap around your finger. Do not remove wrap from finger, insert hook into the wrap and draw up a loop of working yarn. Chain one to secure the loop, and remove ring from finger. Work stitches of first round in the ring. Pull gently, but firmly, on tail to tighten ring.
NOTES
1. The center heart of each piece is worked first. Then stitches are worked around the heart, in joined rounds.
2. Tunic is reversible, and can be worn with either piece facing front.
FIRST PIECE
Center Heart
With A, make an adjustable ring.
Row 1: Ch 2 (does not count as a st here and throughout), 3 dc in ring, turn—3 dc.
Row 2: Ch 2, 2 dc in first st, dc in next st, 2 dc in last st, turn—5 dc.
Rows 3–5: Ch 2, 2 dc in first st, dc in each st across to last st, 2 dc in last st, turn—11 dc at end of Row 5.
Row 6: Ch 2, turn, dc in each st across, turn.
Row 7: Skip first 2 sts, 5 tr in next st, skip next 2 sts, slip st in next st, skip next 2 sts, 5 tr in next st, skip last 2 sts, slip st in top of beginning ch.
Begin Working in Rounds
Round 8 (Right Side): Ch 1, do not turn, working in ends of rows down side of heart, work 10 hdc evenly spaced across side edge, 3 hdc in adjustable ring at point, 10 hdc evenly spaced across other side edge, 2 hdc in each of next 5 tr, slip st in next slip st, 2 hdc in each of next 5 tr; join with slip st in beginning ch—44 sts. Fasten off A.
Round 9: With Right Side facing, join B with slip st in same st as join, ch 4 (counts as first tr here and throughout), tr in same st as join, ch 5, skip next st, *2 tr in next st, ch 5, skip next tr; repeat * around; join with slip st in top of beginning ch—44 tr and 22 ch-5 spaces.
Round 10: Slip st in each of next 3 ch, ch 10 (counts as hdc, ch-8), *hdc in next ch-5 space, ch 8; repeat from * around; join with slip st in 2nd ch of beginning ch—22 hdc and 22 ch-8 spaces.
Round 11: Slip st in each of next 5 ch, ch 10 (counts as hdc, ch-8), *hdc in next ch-8 space, ch 8; repeat from * around; join with slip st in 2nd ch of beginning ch—22 hdc and 22 ch-8 spaces.
Round 12: Ch 7 (counts as dc, ch-4), dc in next ch-8 space, ch 4, *dc in next hdc, ch 4, dc in next ch-8 space, ch 4; repeat from * around; join with slip st in 3rd ch of beginning ch—44 dc and 44 ch-4 spaces. Fasten off B.
Place markers for increase locations: Place piece on a flat surface. Identify the 10 ch-4 spaces of the last round, centered above the heart. Place a marker in the dc before these 10 center ch-4 spaces and place another marker in the dc following the center ch-4 spaces. Continuing around the piece, skip the next 10 ch-4 spaces and place another marker in the next dc. Skip the next 14 ch-4 spaces and place another marker in the next dc.
As the following rounds are worked, move the markers into the ch-2 space of the (dc, ch 2, dc) worked at each marked location.
Round 13: With Right Side facing, join B with slip st in any of the marked dc, ch 5 (counts as dc, ch-2), dc in same st, [ch 5, *dc in next dc, ch 5; repeat from * to next marked dc, (dc, ch 2 dc) in marked dc] 3 times, ch 5, **dc in next dc, ch 5; repeat from ** to end of round; join with slip st in 3rd ch of beginning ch—48 dc and 48 ch spaces.
Rounds 14–18: Slip st in next ch-2 space, ch 5, dc in same ch-2 space, [ch 6, *dc in next dc, ch 6; repeat from * to next marked ch-2 space, (dc, ch 2 dc) in ch-2 space] 3 times, ch 6, **dc in next dc, ch 6; repeat from ** to end of round; join with slip st in 3rd ch of beginning ch. Fasten off B.
Round 19: With Right Side facing, join A with slip st in any marked ch-2 space, ch 5, dc in same ch-2 space, [ch 8, *dc in next dc, ch 8; repeat from * to next marked ch-2 space, (dc, ch 2 dc) in ch-2 space] 3 times, ch 8, **dc in next dc, ch 8; repeat from ** to end of round; join with slip st in 3rd ch of beginning ch.
Rounds 20 and 21: Slip st in next ch-2 space, ch 5 (counts as ch-2, dc), dc in same ch-2 space, [ch 8, *dc in next dc, ch 8; repeat from * to next marked ch-2 space, (dc, ch 2 dc) in ch-2 space] 3 times, ch 8, **dc in next dc, ch 8; repeat from ** to end of round; join with slip st in 3rd ch of beginning ch. Fasten off A. Remove markers.
SECOND PIECE
Work same as First Piece, using B for the heart, A for Rounds 9–18, and B for Rounds 19–21.
FINISHING
Place one piece on top of the other pieces, with Right Sides together, with hearts matching, and stitches of last round matching. Work from the Wrong Side of the pieces.
Place markers for neck edges: Identify the 4 ch-8 spaces of the last round, centered above the heart. Place a marker in the dc before these 4 center ch-8 spaces, and place another marker in the dc following the center 4 ch-8 spaces (for neck edges).
Seam first shoulder and side: Work through both thicknesses. Join B with slip st in one of the marked dc. Working in sts of last round and working down side of pieces (not across neck), sc in next 8 ch, [sc in next dc, sc in next 8 ch] 2 times, fasten off (shoulder seamed), skip next 6 chspaces, join B with slip st in next dc, sc in next 8 ch, [sc in next dc, sc in next 8 ch] 3 times, fasten off (side seamed).
Seam second shoulder and side: Join B with slip st in other marked dc. Working in sts of last round, down other side of pieces, work second shoulder and side seams in same manner as first shoulder and side seams. Weave in ends. Turn tunic Right Side out.
ABBREVIATIONS: A, and B = Colors A, and B; ch =
chain; dc = double crochet; hdc = half double crochet;
sc = single crochet; st(s) = stitch (es); tr = treble (triple)
crochet; () = work directions in parentheses into same
st; [ ] = work directions in brackets the number of times
specified; * or * = repeat whatever follows the * or ** as
indicated.
Be sure to…
Visit my Website
Join me on Facebook
Subscribe to the Maggie Weldon YouTube Channel for more crochet lesson videos
Subscribe to Maggie’s Crochet YouTube Channel for product reviews
Sign Up for My Newsletter
Follow us on Pinterest
Follow us on Twitter


No Comments