From www.RedHeart.com
Embellished Paisley Purse Free Crochet Pattern
Pattern Number: LW5003
Designed By: Michele Wilcox
Skill Level: Easy
Required Supplies:
COATS® Crème De La Crème®: 3 balls of 350 Dark Linen A, 2 balls of 501 Aqua Jade B, and 1 ball each of 625 Brite Green C, 1 White D, and 856 Navy E
Susan Bates® Crochet Hook: 4 mm [US G-6]
Yarn needle
Additional Supplies Needed:
Pins
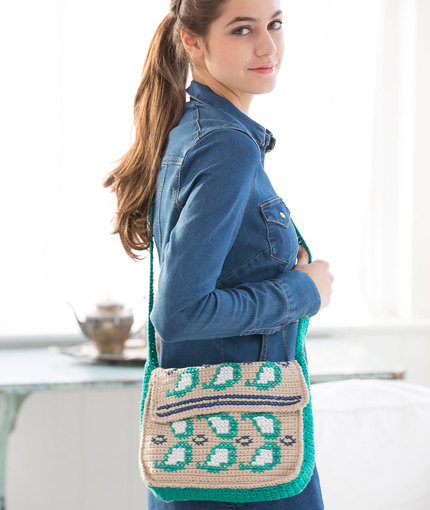
Why carry a bag that looks like all the others when you can crochet one that reflects the crochet-lover in you?! This bag is just the right size and is easy to crochet. The colorful paisley design is added with easy to learn cross-stitch.
Gauge/Tension: GAUGE: 15 sts = 4” [10 cm]; 16 rows = 4” [10 cm] in single crochet (sc). CHECK YOUR GAUGE. Use any size hook to obtain the gauge.
Purse measures about 9 x 11” [23 x 28 cm], not including strap.
Notes
1. Purse is made from 3 pieces: Front, Back with Flap, and Strap and Sides (worked in one piece).
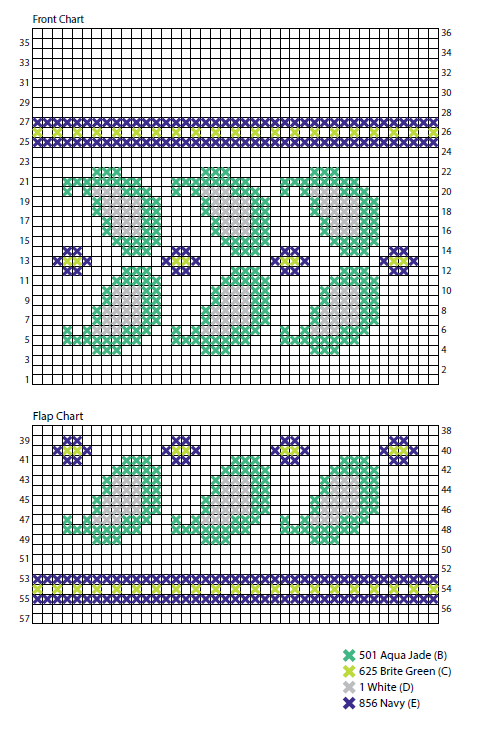
2. The Front and Back flap are embroidered with a cross-stitch paisley design following the charts.
3. Front and Back are sewn to the side edges of the Strap/Sides to assemble the Purse.
Special Stitches
reverse sc (reverse single crochet) = Work single crochet in opposite direction from which you would usually work (left to right if you are right-handed, and right to left if you are left-handed). This stitch is also known as crab stitch. It creates a rope-like twisted single crochet edging.
sc2tog (single crochet 2 stitches together) = [Insert hook in next stitch, yarn over and pull up a loop] twice, yarn over and draw through all 3 loops on hook.
Special Technique
join with sc = Place a slip knot on hook, insert hook in indicated stitch, yarn over and draw up a loop, yarn over and draw
through both loops on hook.
FRONT
Beginning at lower edge with A, ch 42.
Row 1 (wrong side): Sc in 2nd ch from hook and in each remaining ch across—41 sc.
Rows 2–36: Ch 1, turn, sc in each st across.
Top Edging (right side): Ch 1, do not turn, reverse sc in each st across. Fasten off.
Side and Lower Edging (right side): With right side facing, join D with slip st in end of top edging to work down a side edge, sc in end of each row down side edge, 3 sc in corner; working in opposite side of foundation ch, sc in each ch across lower
edge, 3 sc in corner, sc in end of each row up other side edge; join with slip st in edge of top edging. Fasten off.
BACK WITH FLAP
Back
Work same as Front through Row 36.
Row 37: Ch 1, turn, sc in each st across.
Flap
Rows 38–56: Ch 1, turn, sc in each st across.
Round 57: Ch 1, turn, 3 sc in first st (corner made), sc in each st to last st, 3 sc in last st (corner made), sc in end of each row
down side edge, 3 sc in corner; working in opposite side of foundation ch, sc in each ch across lower edge, 3 sc in corner, sc in end of each row up other side edge; join with slip st in first sc. Fasten off.
STRAP AND SIDES
Sides
With B, ch 8.
Row 1: Sc in 2nd ch from hook and in each remaining ch across—7 sc.
Rows 2–108: Ch 1, turn, sc in each st across.
Strap
Row 109: Ch 1, turn, sc2tog, sc in next 3 sts, sc2tog—5 sc.
Row 110: Ch 1, turn, sc in first 2 sts, sc2tog, sc in last st—4 sc.
Rows 111–272: Ch 1, turn, sc in each st across.
Row 273: Ch 1, turn, sc in first st, 2 sc in next st, sc in last 2 sts—5 sc.
Row 274: Ch 1, turn, 2 sc in first st, sc in next 3 sts, 2 sc in last st—7 sc.
Edging
Work sc evenly spaced around entire outer edge of piece, working 3 sc in each corner; join with slip st in first sc. Fasten off.
CROSS-STITCH EMBROIDERY
Embroider cross-stitch paisley pattern on right side of Front, following Front chart.
Embroider cross-stitch paisley pattern on right side of Flap, following Flap chart.
Notes: Flap is top part of Back piece, Rows 38–57. The Flap is folded down over the front. This means that Row 57 is at the
bottom of the Flap Chart and Row 38 is at the top.
FINISHING
Attach Front to Strap and Sides: With wrong sides of pieces together (right sides facing out), carefully pin one edge of Rows
1–108 of Strap and Sides piece to side and lower edges of Front, leaving remaining rows of Strap and Sides piece free for Strap.
Working through both thicknesses, join D with slip st in top right corner of Front (if you are left-handed, join in top left corner of Front), ch 1, reverse sc in each st down side edge, across lower edge, and up 2nd side edge; slip st in end of top edging of Front.
Fasten off.
Attach Back to Strap and Sides: With wrong sides of pieces together (right sides facing out), carefully pin free edge of Rows
1–108 of Strap and Sides piece to side and lower edges of Rows 1–37 of Back and Flap piece. Working through both thicknesses, join D with slip st in top right corner of Back (Row 37) (if you are left-handed, join in top left corner of Back), ch 1, reverse sc in each st down side edge, across lower edge, and up 2nd side edge to other top corner of Back; working through single thickness of flap, reverse sc in each st around flap edges; join with slip st in beginning ch-1. Fasten off. Weave in ends.

No Comments