From RedHeart.com
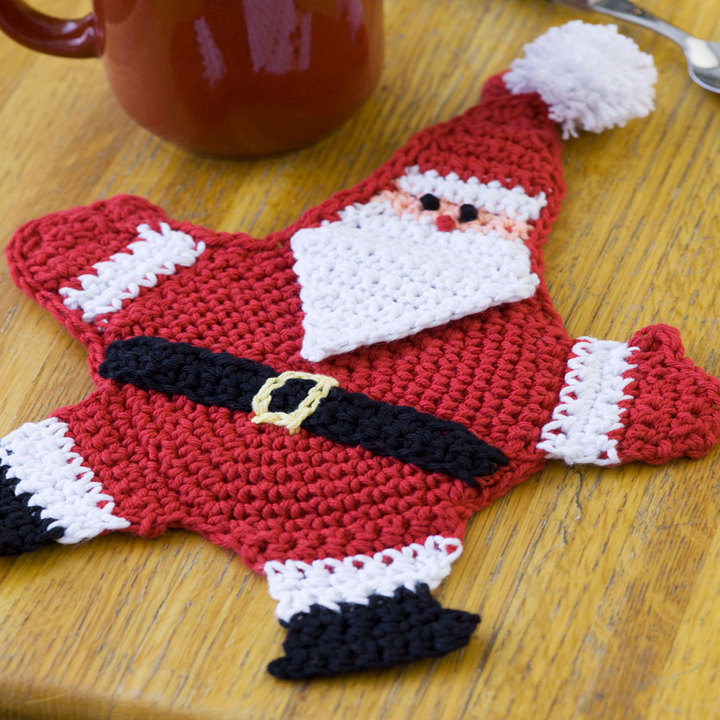
Mr. Claus Potholder
Crochet a Santa potholder that adds a bit of jolly-good fun to your holiday dining. Perfect to make for hostess (or host) gift when you visit friends and family.
Pattern #: WC1906
Designed by Joan Barnett
Project Type: Home Decor, Seasonal, Christmas
Skill Level Intermediate
- Coats® Crème de la Creme®: 1 ball each in 905 Rally Red A, 1 White B, 12 Black C, 255 Tearose D and 205 Golden Yellow E
- Susan Bates® Crochet Hook: 5.0 mm [US H-8]
- Yarn needle
- Pom-pom maker
sc2tog (sc dec) = Insert hook into st and draw up a loop. Insert hook into next st and draw up a loop. Yarn over, draw through all 3 loops on hook.
Body
With A, ch 2
Round 1: Work 6 sc in 2nd ch from hook, slip st to first sc to join.
Round 2: Ch 2 (counts as st here and throughout), turn, sc in same st, work 2 sc in each st around, slip st to top of beginning ch to join – 12 sts.
Round 3: Ch 2, turn, sc in same st, sc in next st, [2 sc in next st, sc in next st] 5 times, slip st to top of beginning ch – 18 sts.
Round 4: Ch 2, turn, sc in same st, sc in next 2 sts, [2 sc in next st, sc in next 2 sts] 5 times, slip st to top of beginning ch – 24 sts.
Round 5: Ch 2, turn, sc in same st, sc in next 3 sts, [2 sc in next st, sc in next 3 sts] 5 times, slip st to top of beginning ch – 30 sts.
Round 6: Ch 2, turn, sc in same st, sc in next 4 sts, [2 sc in next st, sc in next 4 sts] 5 times, slip st to top of beginning ch – 36 sts.
Round 7: Ch 2, turn, sc in same st, sc in next 5 sts, [2 sc in next st, sc in next 5 sts] 5 times, slip st to top of beginning ch – 42 sts.
Round 8: Ch 2, turn, sc in same st, sc in next 6 sts, [2 sc in next st, sc in next 6 sts] 5 times, slip st to top of beginning ch – 48 sts.
Round 9: Ch 2, turn, sc in same st, sc in next 7 sts, [2 sc in next st, sc in next 7 sts] 5 times, slip st to top of beginning ch – 54 sts.
Round 10: Ch 2, turn, sc in same st, sc in next 8 sts, [2 sc in next st, sc in next 8 sts] 5 times, slip st to top of beginning ch – 60 sts.
Row 1: Ch 1, sc in next 9 sts.
Row 2: Ch 1, turn, skip first sc, sc in 8 sc.
Row 3: Ch 1, turn, skip first sc, sc in 7 sc.
Row 4: Change to B, ch 1, turn. Do not cut A. Skip first sc, sc in next 6 sc.
Row 6: Change to A, ch 1, turn, sc in next 6 sc.
Row 7: Ch 1, turn, sc in next 4 sc, sc2tog.
Row 8: Ch 1, turn, sc in next 5 sc.
Row 9: Ch 1, turn, sc in next 3 sc, sc2tog.
Row 10: Ch 1, turn, skip first sc, sc in next sc, sc2tog, turn to work along edge of rows, slip st in next 3 rows, (hdc, dc, hdc, slip st) in next row for Thumb.
Fasten off.
With right side facing, skip 4 sc along edge of Front from Left Arm, join A in next sc.
Row 1: Ch 1, work 8 sc across.
Row 2: Ch 1, turn, sc in next 8 sc.
Row 3: Ch 1, turn, sc in next 8 sc.
Row 4: Change to B, ch 1, turn, sc in next 6 sc, sc2tog.
Row 5: Ch 1, turn, sc in next 7 sc.
Row 6: Ch 1, turn, sc in next 7 sc.
Row 7: Change to C, ch 1, turn, sc in next 7 sc.
Row 8: Ch 1, turn, sc in next 5 sc, sc2tog.
Row 9: Ch 1, turn, sc in next 6 sc.
Row 10: Ch 1, turn to work along edge of rows, (hdc, dc) in next row, (hdc, sc, slip st) in next row.
Fasten off.
With wrong side facing, skip 9 sc along edge of Front from edge of Left Leg. Join A in next st and work as for Left Leg.
With wrong side facing, skip 4 sc along edge of Front from edge of Right Leg. Join A in next st and work as for Left Arm.
With right side facing, join B in first sc after Left Arm.
Row 1: Ch 1, sc in next 8 sc.
Row 2: Ch 1, turn, sc in each sc to last 2 sts, sctog.
Repeat Row 2 until 1 st remains.
Fasten off.
Fold Beard to right side of Front.
Row 1: Join B in first st of Beard, working through sts of both layers of Beard and Front, work 9 sc across.
Row 2: Ch 1, turn, skip next sc, sc in each sc.
Rows 3: Repeat Row 2.
Row 4-5: Ch 1, turn, sc in next 7 sc.
Rows 6-7: Change to D, ch 1, turn, sc in next 7 sc.
Row 8-9: Change to B, ch 1, turn, sc in next 7 sc.
Row 10: Change to A, ch 1, turn, sc in next 7 sc.
With A, repeat Row 2 until 1 st remains.
Fasten off.
With A only, work Body and Right Arm as for Front.
– Using C, embroider 2 French knots on Front Head for eyes. Using A, embroider 1 French Knot for nose.
– With wrong sides together, join A through both layers of Front and Back at edge of Left Arm, sc evenly around edges working through sts of both layers of Body and Head to tip of Head, ch 20 for hanging loop, slip st in same st, sc through sts of both layers of remaining edge of Head, Right Arm and Body to edge of Right Leg. Fasten off.
With C, ch 21, sc in 2nd ch from hook and in each ch across. Fasten off.
Using E, work Chain Stitch Embroidery to make a square in center of Belt for Buckle. Weave in ends.
ABBREVIATIONS: A, B, etc= color A, B, etc; ch = chain; dc = double crochet; hdc = half double crochet; mm = millimeters; sc = single crochet; st(s) = stitch(es); * = repeat whatever follows the * as indicated; [ ] = work directions in brackets the number of times specified.
Be sure to…
Visit my Website
Join me on Facebook
Subscribe to the Maggie Weldon YouTube Channel for more crochet lesson videos
Subscribe to Maggie’s Crochet YouTube Channel for product reviews
Sign Up for My Newsletter
Follow us on Pinterest
Follow us on Twitter


No Comments