When I visit antique shows in search of vintage crochet, I am always amazed and excited with the variety I find. I see vintage patterns and never see the actual piece. Then I see a piece that I have never seen the pattern for. On rare occasions, I find both and that is exciting.
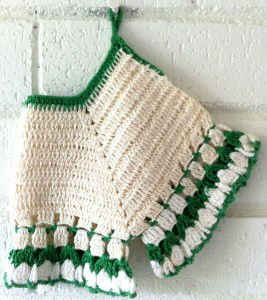
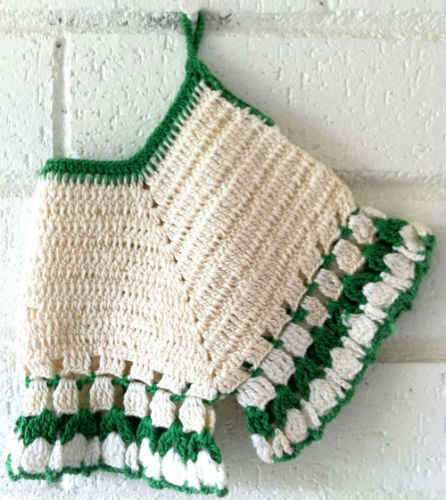
I found this potholder at the Liberty Antique Show. It is a unique twist on the Bloomer Potholder. Bloomer Potholders are so nostalgic and reminiscent of days gone by. The vintage potholders are more for collecting than actual use. They can be used as hot mats but they are not recommended for potholders.
Create these potholders with any arrangement of crochet cotton colors for family and friends. They make great gifts.
Vintage Bloomers Potholder
FP281
Edited By: Maggie Weldon
Copyright 2010 Maggie Weldon
Skill: Easy
Size: About 8 inches wide, 6 inches long
Materials: Number 10 Crochet Thread: White & Green; Thread needle.
Crochet Hook: Steel size 7 (1.65 mm) or size needed to obtain gauge.
Gauge: 10 sts = 1 inch, 4 rows dc = 1 inch
JOINING WITH SC
When instructed to join with sc, begin with sl knot on hook, insert hook in st or sp indicated, yo and pull up a loop, yo and draw through both loops on hook.
Bloomers
Row 1: (Right Side) Starting at waist, with White,
ch 71, dc in 4th ch from hook (skipped ch count as first dc), dc in next 15 ch, ch 2, dc in next 34 ch,
ch 2, dc in next 17 ch. (68 dc)
Rows 2-5: Ch 3, turn, * (dc in next dc) across to
ch-2 sp, (2 dc, ch 2, 2 dc) in ch-2 sp, rep from * once; (dc in next dc) across to end.
(76, 84, 92, 100 dc)
At the end of Row 5, join with sl st to first dc.
Rnd 6-11: Ch 3, turn, * (dc in next dc) across to ch-2 sp, (2 dc, ch 2, 2 dc) in ch-2 sp, rep from * once;
(dc in next dc) around; join.
(108, 116, 124, 132, 140, 148 dc)
Rnd 12: Ch 3, DO NOT TURN, dc in next dc, (ch 2, skip next 2 dc, dc in next 4 dc) 5 times, * ch 2, skip next 2 dc, dc in next 3 dc, (dc, ch 2, dc) in ch-2 sp, dc in next 3 dc *, (ch 2, skip next 2 dc, dc in next 4 dc) 11 times; rep from * to * once, (ch 2, skip next 2 dc, dc in next 4 dc) 5 times, ch 2, skip next 2 dc, dc in next 2 dc; join. Finish off and weave in ends.
Legs
Rnd 1: With right side facing, flatten to align points, working through both thicknesses, join Green with sc to ch-2 sps at point, ch 4, working in single thickness around leg, (sc in next ch-2 sp, ch 4) around; join with sl st to first sc. Finish off and weave in ends.
Rnd 2: With right side facing, join White with sl st to any ch-4 sp, ch 4 (counts as first tr now and throughout), 3 tr in same sp, ch 2, (4 tr in next ch-4 sp, ch 2) around; join with sl st to first tr. Finish off and weave in ends.
Rnd 3: With right side facing, join Green with sl st to any ch-2 sp, ch 4, (tr, ch 2, 2 tr) in same space, ch 2, * (2 tr, ch 2, 2 tr) in next ch-2 sp, ch 2; rep from * around; join. Finish off and weave in ends.
Rnd 4: With right side facing, join White with sl st to ch-2 sp in middle of tr-group, ch 4, 3 tr in same sp, ch 4, sl st in next ch-2 sp, ch 4, (4 tr in next ch-2 sp, ch 4, sl st in next ch-2 sp, ch 4) around; join.
Rnd 5: With right side facing, join Green with sl st to any ch-4 sp, (ch 4, sl st in next ch-4 sp) around; join. Finish off and weave in ends.
– Repeat on other Leg.
Top Edging
Row 1: With right side facing, working in bottom of Rnd 1 between each dc, join Green with sl st between first 2 dc, ch 3, (dc between next dc) across. (66 dc) DO NOT FINISH OFF.
Hanger and Side Edging
Row 1: Ch 20, working in sides of rows over dc posts, 3 sc over ch-3 of Row 1 Top Edging, (3 sc in next row) 11 times, 30 sc over ch-20; join. Finish off and weave in ends.
All Rights Reserved ©2010 Maggie Weldon
Enjoy,
Maggie


Thanks for posting this pattern. I love old fashioned crochet, but it can be hard to find the patterns. Thanks Again!
I have so many Maggie Welton patterns! Love this one!!
Thanks for posting
You’re welcome!