From RedHeart.com
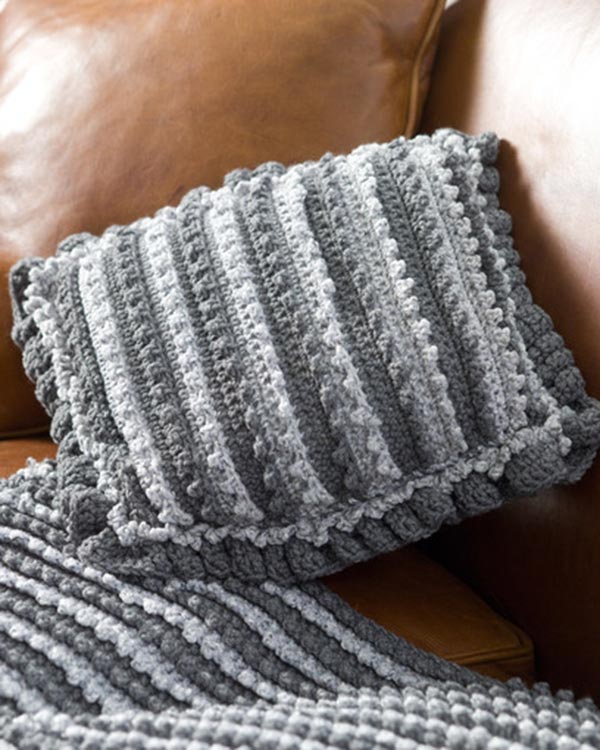
Millenium Loop Pillow
WR2016
Designed By: Glenda Winkleman
Skill Level: Intermediate
RED HEART® “Fiesta®”: 1 skein 6341 Millennium A.RED HEART® “Super Saver®”: 1 skein 500 Grey Heather B.Crochet Hook: 6.50mm [US K-10.5].
14” Pillow Form
Yarn Needle
With B, ch 34.
Row 1 (Right Side): Sc in 2nd ch from hook, sc in each ch across; turn – 33 sc.
Rows 2-43: ch 1, sc in each sc across, turn. Fasten off at the end of Row 43.Border
With Right Side facing, join A in top right hand corner sc. Ch 1, sc in each sc across, ch 1, work 36 sc evenly spaced down edge, ch 1, working across bottom of foundation ch, sc in each ch across, ch 1, work 36 sc evenly spaced up edge, slip st to beginning sc. Fasten off.
Pillow Front
With B, ch 34.
Row 1 (Right Side): Sc in 2nd ch from hook, sc in each ch across; turn – 33 sc.
Rows 2 and 3: Ch 1, sc in each sc across, turn.
Row 4: Ch 1, sc in back loop of first 3 sc, ch 3, slip st in top of last sc made, *sc in back loop of next 2 sc, ch 3, slip st in top of last sc made; repeat from * to last 2 sc; sc in back loop of last 2 sc; turn. Fasten off.
Row 5 (Right Side): With A, join in back loop of first sc 2 rows below; ch 1, sc in back loop of each sc across; turn.
Rows 6 and 7: Working in both loops, sc in each sc across; turn.
Row 8: Repeat Row 4.
Rows 9-12: With B, repeat Rows 5-8.
Rows 13-52: Repeat Rows 5-12, 5 times.
Border
With right side facing, join A in back loop of first sc in top right hand corner of Row 51.
Rnd 1: Ch 1, sc in back loop of each sc across Row 51, ch 1, work 36 sc evenly spaced along side edge, ch 1, working across bottom of foundation ch, sc in each ch across, ch 1, work 36 sc evenly spaced along side edge, ch 1, join with slip st to beginning sc. Fasten off.
Pillow Assembly and Border
Place front and back pieces with wrong sides together.
Rnd 1: With A, beginning at upper right corner, ch 1, working through both front and back scs together (sc in each sc across, 2 sc in corner ch-space) 3 times; working through single thickness of pillow front only, sc in each sc across, 2 sc in corner ch-space, join with slip st to front loop of first sc.
Rnd 2: *Ch 5, slip st in front loop of next sc*, repeat from * around, join with slip st in front loop of first sc. Fasten off.
Rnd 3: Join B in back loop of first sc in upper right hand corner 2 rnds below, ch 3 (counts as dc), 2 dc in back loop of first sc, 3 dc in back loop of each sc around, join with slip st to top of ch-3.
Rnd 4: Ch 3 (counts as dc), dc in each dc around, join with slip st to top of ch-3. Fasten off.
Insert Pillow Form into pillow cover. With yarn needle and matching yarn, sew opening closed.
ABBREVIATIONS: A, B = color A, B; ch = chain;
dc = double crochet; mm = millimeters; rnd(s) = round(s);
sc = single crochet; * = repeat whatever follows the * as
indicated.
Be sure to…
Visit my Website
Join me on Facebook
Subscribe to the Maggie Weldon YouTube Channel for more crochet lesson videos
Subscribe to Maggie’s Crochet YouTube Channel for product reviews
Sign Up for My Newsletter
Follow us on Pinterest
Follow us on Twitter


No Comments