From RedHeart.com
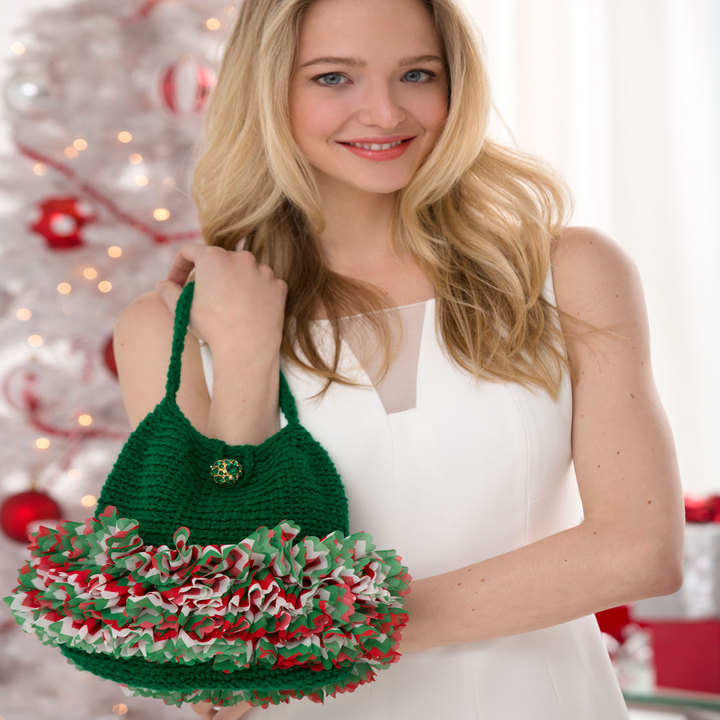
Designer Ruffle Bag
With just a skein of yarn and a hank of Sassy Fabric, you can crochet a designer bag in little time! Choose from any of the Sassy Fabric prints.
Pattern #: LW4420
Designed by: Trish Warrick
Project Type: Accessories, Seasonal, Christmas
Skill Level Easy
Required Supplies:
- RED HEART® Super Saver®: 1 skein 368 Paddy Green A
- RED HEART® Boutique Holiday Sassy Fabric™: 1 hank 9950 Holiday Chevron B
- Susan Bates® Crochet Hook: 4mm [US G-6]
- Yarn needle
- 2 stitch markers
Additional Supplies Needed:
One 1¼” (32 mm) button, sewing needle and matching thread, fabric sealant (optional)
GAUGE: 12 sts = 4” (10 cm); 11 rounds = 4” (10 cm) in single crochet with A. CHECK YOUR GAUGE. Use any size hook to obtain the gauge.
Purse measures 8½” high x 11” across bottom (21.5 x 28 cm).
Special Stitches
beg ruf slip st (beginning ruffle slip st) = working in front loop only, insert hook in indicated stitch of A; [insert hook from front to back in next hole of B] twice, draw top edge of last hole through 2 loops on hook.
ruf slip st (ruffle slip st) = working in front loop only, insert hook in indicated stitch of A; [insert hook from front to back in next hole of B] twice, draw top edge of last hole through all 3 loops on hook.
sc2tog = [Insert hook in next stitch, yarn over and pull up a loop] twice, yarn over and draw through all 3 loops on hook.
Notes
1. After bottom is made in rows, purse is worked in continuous rounds with right side facing. Do not join at the end of each round unless otherwise instructed. Place marker for beginning of round and move marker up as each round is completed.
2. Fabric has holes running along top edge. Always insert hook in hole from front to back of fabric and work into each hole of fabric to create fullest ruffles.
3. If you prefer to work from the center of the hank rather than the outer edge, slide the paper band to one end, remove the cardboard, and gently pull out the fabric.
4. Prepare the fabric for stitching by folding the cut edge to the underside of the fabric and hold first 2 holes together as one.
5. Ruffles are worked from the lower end of the purse up in a spiral.
PURSE
Bottom
With A, ch 25.
Row 1 (right side): Sc in 2nd ch from hook and in each ch across, turn—24 sc.
Rows 2–4: Ch 1, sc in each sc, turn. Do not fasten off. Continue in rounds.
Bottom
With A, ch 25.
Row 1 (right side): Sc in 2nd ch from hook and in each ch across, turn—24 sc.
Rows 2–4: Ch 1, sc in each sc, turn. Do not fasten off. Continue in rounds.
Sides
Round 1: Ch 1, sc in each sc across; working across ends of rows of first side, *3 sc in first row, sc in next 3 rows, 3 sc in last row*; working across opposite side of foundation ch, sc in each ch; working across ends of rows of other side; repeat from * to * once; join with slip st in first sc—66 sc. Place marker in first stitch and move up as each round is completed.
Rounds 2–22: Working in back loops only, sc in each sc. Place marker on first stitch of Round 6 for ruffle placement.
Round 23: Working in back loops only, *sc in next 9 sc, sc2tog; repeat from * around—60 sc.
Round 24: Working in back loops only, *sc in next 3 sc, sc2tog; repeat from * around—48 sc.
Round 25: Working in back loops only, *sc in next 6 sc, sc2tog; repeat from * around—42 sc.
Round 26: Working in back loops only, *sc in next 5 sc, sc2tog; repeat from * around—36 sc.
Round 27: Working in back loops only, slip st in next 9 sc, ch 15 (button loop made), slip st in next 27 sc; join with slip st in first sc. Fasten off.
Ruffles
Round 1: With right side and marked stitch of Round 6 facing, beg ruf slip st in marked sc, ruf slip st in each remaining sc around—66 ruf slip sts.
Round 1: With right side and marked stitch of Round 6 facing, beg ruf slip st in marked sc, ruf slip st in each remaining sc around—66 ruf slip sts.
Rounds 2–4: Skip next round; working in next round, ruf slip st in each sc around.
Fasten off as follows: cut B after next hole, insert hook through last hole and pull top edge of fabric through loop on hook. Gently pull remaining tail through loop and tighten.
Fasten off as follows: cut B after next hole, insert hook through last hole and pull top edge of fabric through loop on hook. Gently pull remaining tail through loop and tighten.
Handles
Flatten purse so button loop is centered and stitch at end of each top edge is obvious.
Round 1: Join A with slip st to st at end of top edge, ch 35, skip next 16 sts, slip st in next 2 sts, ch 35, skip next 16 sts, slip st in next st.
Round 2: Slip st in each ch. Fasten off.
Flatten purse so button loop is centered and stitch at end of each top edge is obvious.
Round 1: Join A with slip st to st at end of top edge, ch 35, skip next 16 sts, slip st in next 2 sts, ch 35, skip next 16 sts, slip st in next st.
Round 2: Slip st in each ch. Fasten off.
FINISHING
With a strand of A, sew button on front of purse under button loop.
If desired, apply fabric sealant to cut ends of B to prevent fraying. Tuck ends under and tack in place with sewing needle and thread.
Weave in ends.
With a strand of A, sew button on front of purse under button loop.
If desired, apply fabric sealant to cut ends of B to prevent fraying. Tuck ends under and tack in place with sewing needle and thread.
Weave in ends.
ABBREVIATIONS
A, B = Color A, Color B; ch = chain; sc = single crochet; st(s) = stitch(es); [ ] = work directions in brackets the number of times specified; * = repeat whatever follows the * as indicated.
A, B = Color A, Color B; ch = chain; sc = single crochet; st(s) = stitch(es); [ ] = work directions in brackets the number of times specified; * = repeat whatever follows the * as indicated.
Be sure to…
Visit my Website
Join me on Facebook
Subscribe to the Maggie Weldon YouTube Channel for more crochet lesson videos
Subscribe to Maggie’s Crochet YouTube Channel for product reviews
Sign Up for My Newsletter
Follow us on Pinterest
Follow us on Twitter


No Comments