From RedHeart.com
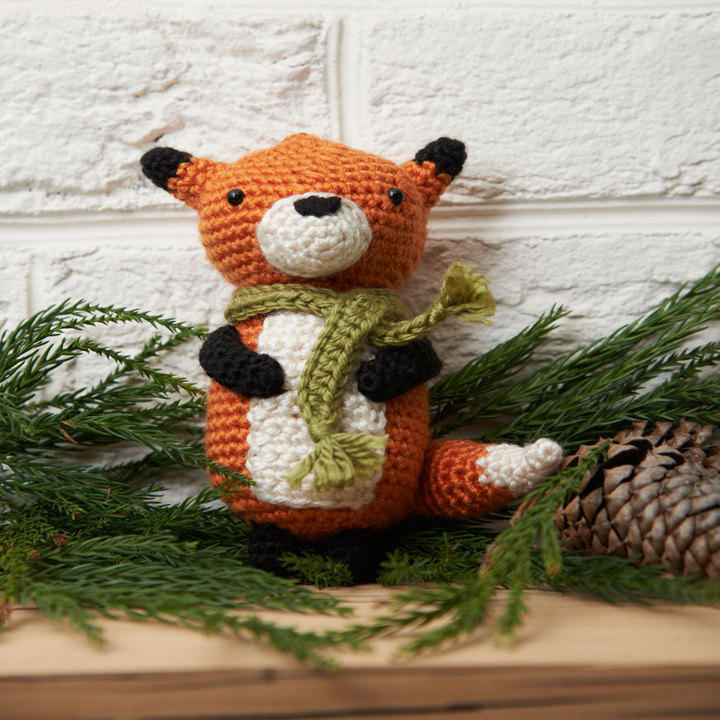
Fox Ornament
This sly little fox is right at home in a pine garland on the mantel. He is crocheted with a bright scarf so he can’t hide in your tree.
Pattern #: LW3701
Designed by: Sahrit Freud-Weinstein
Project Type: Seasonal, Home Decor, Christmas
Skill Level: Easy
Required Supplies:
- RED HEART® Soft®: 1 ball each 4422 Tangerine A, 4601 Off White B, 4614 Black C, and 9522 Leaf D
- Susan Bates® Crochet Hook: 4mm [US G-6]
- Yarn needle
- Stitch markers
Additional Supplies Needed:
Fiberfill, 1 pair 6 mm black safety eyes
GAUGE: 19 sc = 4″ (10cm); 22 rows = 4″ (10cm) in single crochet. CHECK YOUR GAUGE. Use any size hook to obtain the gauge.
Fox measures 7” (18 cm) tall
Special Stitch
sc2tog = [Insert hook in next stitch, yarn over and pull up a loop] twice, yarn over and draw through all 3 loops on hook.
sc2tog = [Insert hook in next stitch, yarn over and pull up a loop] twice, yarn over and draw through all 3 loops on hook.
Special Technique
Adjustable-ring method-Wrap yarn into a ring, ensuring that the tail falls behind the working yarn. Grip ring and tail firmly between middle finger and thumb. Insert hook through center of ring, yarn over (with working yarn) and draw up a loop. Work stitches of first round in the ring. After the first round of stitches is worked, pull gently, but firmly, on tail to tighten ring.
Adjustable-ring method-Wrap yarn into a ring, ensuring that the tail falls behind the working yarn. Grip ring and tail firmly between middle finger and thumb. Insert hook through center of ring, yarn over (with working yarn) and draw up a loop. Work stitches of first round in the ring. After the first round of stitches is worked, pull gently, but firmly, on tail to tighten ring.
Notes
1. Only small quantities of B, C, and D are needed for this project.
2. Gauge is not critical for this project. Work tightly so stuffing does not show through stitches.
3. For sections worked in continuous rounds, place marker for beginning of round and move marker up as each round is completed. Do not join rounds until instructed to do so.
4. To change color, work last stitch of old color to last yarn over. Yarn over with new color and draw through all loops on hook to complete stitch. Proceed with new color. In some cases, the old color can be carried up the wrong side (inside) of the piece when next needed. This will reduce the number of ends to weave in later.
FOX
Body and head
Note: Insert stuffing firmly every few rounds.
With A, make an adjustable ring.
Body and head
Note: Insert stuffing firmly every few rounds.
With A, make an adjustable ring.
Round 1 (right side): Work 6 sc in ring; do not join, work in continuous rounds (spiral)—6 sc.
Round 2: Work 2 sc in each sc around—12 sc.
Round 3: [2 sc in next sc, sc in next sc] 6 times—18 sc.
Round 4: [2 sc in next sc, sc in next 2 sc] 6 times—24 sc.
Round 5: [2 sc in next sc, sc in next 3 sc] 6 times—30 sc.
Round 6: [2 sc in next sc, sc in next 4 sc] 6 times—36 sc.
Rounds 7–18: Sc in each sc around.
Round 19: [Sc2tog, sc in next 4 sc] 6 times—30 sc.
Round 20: [Sc2tog, sc in next 3 sc] 6 times—24 sc.
Round 21: [Sc2tog, sc in next 2 sc] 6 times—18 sc.
Rounds 22 and 23: Sc in each sc around.
Round 24: [2 sc in next sc, sc in next 2 sc] 6 times—24 sc.
Round 25: [2 sc in next sc, sc in next 3 sc] 6 times—30 sc.
Round 26: [2 sc in next sc, sc in next 4 sc] 6 times—36 sc. Place stitch marker on this round for placement of nose.
Round 27: [2 sc in next sc, sc in next 5 sc] 6 times—42 sc.
Round 28: [2 sc in next sc, sc in next 6 sc] 6 times—48 sc.
Rounds 29–31: Sc in each sc around. Place stitch marker on Round 31 for placement of nose.
Round 32: [Sc2tog, sc in next 6 sc] 6 times—42 sc. Place stitch marker between Rounds 31 and 32 for placement of safety eyes.
Round 33: [Sc2tog, sc in next 5 sc] 6 times—36 sc.
Round 34: Sc in each sc around.
Round 35: [Sc2tog, sc in next 4 sc] 6 times—30 sc.
Round 36: [Sc2tog, sc in next 3 sc] 6 times—24 sc.
Round 37: [Sc2tog, sc in next 2 sc] 6 times—18 sc.
Round 38: [Sc2tog, sc in next sc] 6 times—12 sc.
Round 39: Sc2tog 6 times—6 sc.
Fasten off, leaving a long tail for sewing.
Attach safety eyes between Rounds 31 and 32, 10 sts apart. Insert more stuffing as needed for a firm head. Weave tail through remaining sts and pull tightly.
Nose
With B, make an adjustable ring.
Round 1 (right side): Work 6 sc in ring; do not join, work in continuous rounds (spiral)—6 sc.
Round 2: [2 sc in next sc, sc in next 2 sc] twice—8 sc.
Round 3: [2 sc in next sc, sc in next 3 sc] twice—10 sc.
Round 4: [2 sc in next sc, sc in next 4 sc] twice—12 sc.
Round 5: [2 sc in next sc, sc in next 2 sc] 4 times; join with slip st in first sc—16 sc.
Fasten off, leaving a long tail for sewing. Insert stuffing. Using photograph as a guide for shape, with C and short stitches, embroider a snout to top of nose. Sew nose to head between Rounds 26 and 31.
Belly patch
Working from bottom up, with B, ch 6.
Row 1 (right side): Work 2 sc in 2nd ch from hook, sc in next 3 ch, 2 sc in last ch, turn—7 sc.
Rows 2–14: Ch 1, sc in each sc, turn.
Row 15: Ch 1, skip first sc, sc in next 5 sc, slip st in last sc—4 sc.
Fasten off, leaving a long tail for sewing. Sew belly patch to front of body.
Paws (make 2)
With C, make an adjustable ring.
Round 1 (right side): Work 6 sc in ring; do not join, work in continuous rounds (spiral)—6 sc.
Rounds 2–9: Sc in each sc around; join with slip st in first sc at end of Round 9—6 sc.
Fasten off, leaving a long tail for sewing.
Position paws downward diagonally over body and sew to body a few rows below neck.
Feet (make 2)
Work same as Rounds 1-4 of paws; join with slip st in first sc at end of Round 4.
Fasten off, leaving a long tail for sewing. Insert stuffing firmly. Sew feet to bottom of body.
Work same as Rounds 1-4 of paws; join with slip st in first sc at end of Round 4.
Fasten off, leaving a long tail for sewing. Insert stuffing firmly. Sew feet to bottom of body.
Ears (make 2)
With C, make an adjustable ring.
Round 1 (right side): Work 6 sc in ring; do not join, work in continuous rounds (spiral)—6 sc.
Rounds 2 and 3: Sc in each sc around; change to A at end of Round 3. Fasten off C.
Round 4: Sc in each sc around.
Rounds 5 and 6: Work same as Rounds 2 and 3 of nose; join with slip st in first sc at end of Round 6—10 sc.
Fasten off, leaving a long tail for sewing. Insert stuffing firmly. Using photograph as a guide for placement, sew ears to head.
Tail
Note: Insert stuffing firmly every few rounds.
With B, make an adjustable ring.
Round 1 (right side): Work 4 sc in ring; do not join, work in continuous rounds (spiral)—4 sc.
Round 2: Sc in each sc around.
Round 3: [2 sc in next sc, sc in next sc] twice—6 sc.
Round 4: Sc in each sc around.
Round 5: [2 sc in next sc, sc in next 2 sc] twice—8 sc.
Round 6: Sc in each sc around; change to A. Fasten off B.
Round 7: [2 sc in next sc, sc in next 3 sc] twice—10 sc.
Round 8: Sc in each sc around.
Round 9: [2 sc in next sc, sc in next 4 sc] twice—12 sc.
Round 10: [2 sc in next sc, sc in next 5 sc] twice—14 sc.
Round 11: Sc in each sc around.
Round 12: [Sc2tog, sc in next 5 sc] twice—12 sc.
Round 13: [Sc2tog, sc in next 4 sc] twice—10 sc.
Round 14: [Sc2tog, sc in next 3 sc] twice—8 sc.
Fasten off, leaving a long tail for sewing. Insert more stuffing as needed for a firm tail. With edges of last round held together, sew tail closed. Holding tail horizontally, sew to right backside of body a few rows above beginning rounds.
Scarf
With D, ch 51.
Row 1: Hdc in 3rd ch from hook (beginning ch count as first hdc), hdc in each ch across—50 hdc.
Fasten off. Cut 8 lengths of D, each 3” (7.5 cm) long. *Hold 4 lengths together and fold them in half forming a loop at the fold. Insert crochet hook in end of scarf, place fold of strands on hook and draw loop through. Insert ends of folded strands into loop and pull to tighten; repeat from * to attach remaining 4 strands to other end. Trim fringe to even length. Wrap scarf around neck and, if desired, secure in place.
FINISHING
To make hanging loop, cut a length of A 15” (38 cm) long, thread through top of head, and tie ends in a knot.
Weave in ends.
To make hanging loop, cut a length of A 15” (38 cm) long, thread through top of head, and tie ends in a knot.
Weave in ends.
ABBREVIATIONS
A, B, C = Color A, Color B, Color C, etc.; ch= chain; hdc = half double crochet; sc = single crochet; st(s) = stitch(es); [ ] = work directions in brackets the number of times specified; * = repeat whatever follows the * as indicated.= work directions in brackets the number of times specified.
A, B, C = Color A, Color B, Color C, etc.; ch= chain; hdc = half double crochet; sc = single crochet; st(s) = stitch(es); [ ] = work directions in brackets the number of times specified; * = repeat whatever follows the * as indicated.= work directions in brackets the number of times specified.
Be sure to…
Visit my Website
Join me on Facebook
Subscribe to the Maggie Weldon YouTube Channel for more crochet lesson videos
Subscribe to Maggie’s Crochet YouTube Channel for product reviews
Sign Up for My Newsletter
Follow us on Pinterest
Follow us on Twitter
No Comments