
From RedHeart.com
Holiday Hearts Throw
Hearts will be warmed when greeted by this happy throw. The unique edging adds interest to a project sure to become a family heirloom for many holidays to come.
Pattern #: LW3202
Designed by: Ann Regis
Project Type: Throws/Afghans, Seasonal, Christmas
Skill Level: Intermediate
- RED HEART® Holiday®: 4 balls 6060 Green/Green A, 3 balls 9090 Red/Red B, 1 ball 0140 White/ Silver C
- Susan Bates® Crochet Hook: 6.5mm [US K-10.5]
- Yarn needle
GAUGE: 13 sts = 4″ (10 cm); 5 rows = 3″ (8 cm) in double crochet; one block measures about 8 x 8″ (20 x 20 cm) square. CHECK YOUR GAUGE. Use any size hook to obtain the gauge.
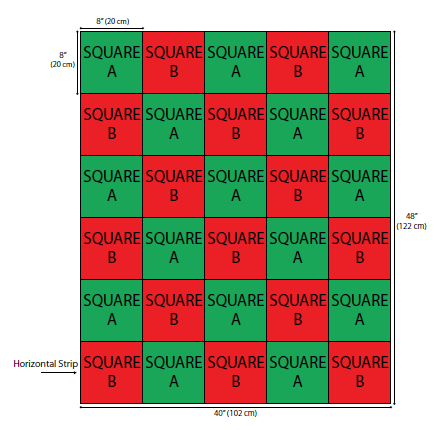
Throw measures 45” (114 cm) wide x 53” (135 cm) long, including border
Notes
1. Throw is made from 30 squares: 15 each of Square A and Square B.
2. Squares A and B are made the same using different color sequences.
3. Squares are worked in joined rounds with Right Side facing at all times.
4. To change color, work last stitch of old color to last yarn over. Yarn over with new color and draw through all loops on hook to complete stitch. Proceed with new color. Fasten off old color.
5. When instructed to work into the first ch space, this is always the first ch-space following the join of the previous round.
SQUARE A (make 15)
With C, ch 5; join with slip st in first ch to form a ring.
Round 1 (Right Side): Ch 4 (counts as dc, ch 1), [dc in ring, ch 1] 5 times, tr in ring, [ch 1, dc in ring] 5 times, ch 1; join with slip st in 2nd ch of beginning ch—1 tr, 11 dc, and 12 ch-1 spaces. Fasten off.
Round 2: With Right Side facing, draw up a loop of B in first ch-1 space, ch 2 (counts as hdc here and throughout), 2 dc in same ch-1 space, 3 tr in next ch-1 space, 2 tr in next ch-1 space, 2 dc in each of next 2 ch-1 spaces, (dc, tr) in next ch-1 space, tr in next tr, (tr, dc) in next ch-1 space, 2 dc in each of next 2 ch-1 spaces, 2 tr in next ch-1 space, 3 tr in next ch-1 space, (2 dc, hdc) in last ch-1 space; join with slip st in top of beginning ch—29 sts.
Round 3: Ch 2, dc in next st, 2 dc in each of next 3 sts, dc in next st, hdc in next 8 sts, 3 dc in next tr (for lower tip of heart), hdc in next 8 sts, dc in next st, 2 dc in each of next 3 sts, dc in next st, hdc in last st; join with slip st in top of beginning ch—37 sts. Fasten off.
Round 4: With Right Side facing, draw up a loop of C in center dc of 3-dc group at lower tip of heart, [ch 3, skip next st, sc in next st] 8 times, ch 3, dc around post of beginning ch of Round 1 drawing up a long loop so fabric does not pucker, ch 3, skip next 4 sts of Round 3, sc in next st, [ch 3, skip next st, sc in next st] 7 times, ch 3; end with sc in center dc of 3-dc lower tip—18 ch-3 spaces. Fasten off.
Round 5: With Right Side facing, draw up a loop of A in first ch-3 space (at lower tip of heart), ch 2, (hdc, dc) in same ch-3 space, (dc, 2 tr) in next ch-3 space, (2 tr, ch 1, 2 tr) in next ch-3 space (corner made), (tr, 3 dc) in next ch-3 space, 4 dc in each of next 2 ch-3 spaces, (2 dc, ch 2, 2 dc) in next ch-3 space (corner made), 3 dc in each of next 4 ch-3 spaces, (2 dc, ch 2, 2 dc) in next ch-3 space (corner made), 4 dc in each of next 2 ch-3 spaces, (3 dc, tr) in next ch-3 space, (2 tr, ch 1, 2 tr) in next ch-3 space (corner made), (tr, 2 dc) in next ch-3 space, (dc, 2 hdc) in last ch-3 space; join with slip st in top of beginning ch—64 sts and 4 corner ch-spaces (16 sts between corner ch-spaces).
Round 6: Ch 3, dc in each st around, working (2 dc, ch 2, 2 dc) in each corner ch-space; join with slip st in top of beginning ch—80 dc and 4 corner ch-2 spaces (20 sts between corner ch-spaces).
Round 7: Slip st in next st, ch 4 (counts as dc, ch 1), skip next dc, dc in next dc, [ch 1, skip next dc, dc in next dc] 3 times, ch 1, skip next dc, (dc, ch 2, dc) in corner ch-2 space, *[ch 1, skip next dc, dc in next dc] 10 times, ch 1, (dc, ch 2, dc) in corner ch-2 space; repeat from * 2 more times, [ch 1, skip next dc, dc in next dc] 5 times, ch 1, slip st in 3rd ch of beginning ch – 48 dc and 48 ch-spaces. Fasten off.
SQUARE B (make 15)
Make same as Square A, changing color as in following sequence: Work Round 1 with C, Rounds 2 and 3 with A, Round 4 with C, Rounds 5–7 with B.
FINISHING
Arrange squares into 6 horizontal strips of 5 squares each. Alternate squares A and squares B across, for 3 strips beginning and ending with square A, and 3 strips beginning and ending with square B, as shown in assembly diagram.
Join Squares in Horizontal Strips: Hold neighboring squares with Wrong Sides together and work from the Right Side. Match the dc sts and ch-1 spaces of the squares. Join B with sc in the beginning corner ch-2 space, ch 1, sc in next ch-space, *ch 1, sc in next ch-space; repeat from * across to join squares. Fasten off. Take care to work evenly and not to tighten up. Repeat this process to join all 5 squares into one horizontal strip. Repeat to make all 6 horizontal strips.
Join Horizontal Strips: With A, join the long edges of neighboring horizontal strips together in same way as squares were joined.
Border
Round 1: With Right Side facing, draw up a loop of A in any corner ch-2 space, ch 3, dc in same ch-2 space, work 2 dc in each ch-1 space,1 dc in each join between squares, and (2 dc, ch 2, 2 dc) in each corner ch-2 space around; to end, work 2 dc in same ch-2 space as beginning, ch 2; join with slip st in top of beginning ch. Fasten off.
Round 2: With Right Side facing, draw up a loop of B in any corner ch-2 space, ch 2, hdc in same ch-2 space, hdc in each dc to next corner ch-2 space, (2 hdc, ch 2, 2 hdc) in corner ch-2 space, hdc in each dc to next corner ch-2 space, 2 hdc in corner ch-2 space; change to C, ch 2, 2 hdc in same corner ch-2 space, hdc in each dc to next corner ch-2 space, (2 hdc, ch 2, 2 hdc) in corner ch-2 space, hdc in each dc to next corner ch-2 space, 2 hdc in same ch-2 space as beginning, ch 2; join with slip st in top of beginning ch. Fasten off.
Round 3: With Right Side facing, draw up a loop of A in any corner ch-2 space, ch 3 (counts as hdc, ch 1), skip next hdc, hdc in next hdc, *ch 1, skip next hdc, hdc in next hdc; repeat from * evenly around, working (hdc, ch 2, hdc) in each corner ch-2 space; to end, work ch 2; join with slip st in 2nd ch of beginning ch-3. Fasten off.
Corner Floral Trim
Corner Flower: With Right Side facing, join B with sc around post of first hdc of any corner in Round 2 of border, [ch 10, sc around post of same hdc] 3 times, ch 10, sc in ch-2 corner space of Round 1, [ch 10, sc in same ch-2 space of Round 1] 3 times, ch 10, sc around post of last hdc of same corner in Round 2, [ch 10, sc around post of same hdc] 3 times. Fasten off.
Corner Leaves: With Right Side facing, working behind the corner flower, join A with sc in corner ch-2 space of Round 3, [ch 10, sc in same ch-2 space] 5 times. Fasten off. With Right Side facing, join A with sc in ch-1 space of Round 3 three spaces before the corner space (to work towards the corner space), *[ch 10, sc in same ch-1 space] 3 times, ch 10, sc in next ch-space; repeat from * 2 more times working the last sc in the corner ch-space behind and between the sc sts already worked into the space; **ch 10, sc in next ch-1 space, [ch 10, sc in same ch-1 space] 3 times; repeat from ** 2 more times. Fasten off.
Finish Edges between Corner Floral Trim: With Right Side facing, draw up a loop of A in ch-1 space before corner leaves (to work in opposite direction towards previous corner floral trim), ch 2, working in opposite direction, hdc in each ch-1 space across to previous corner floral trim. Fasten off. Repeat to finish remaining three edges. Note: If you are right-handed, working in opposite direction means that you will work from left to right. If you are left-handed it means that you will work from right to left. Weave in ends.
ABBREVIATIONS
A, B, C = color A, B, C; ch = chain; dc = double crochet; hdc = half double crochet; sc = single crochet; st(s) = stitch(es); tr = treble crochet ; * or ** = repeat whatever follows the * or ** as indicated; [] = work directions in brackets the number of times specified; () = work directions in parentheses into same st.
Be sure to…
Visit my Website
Join me on Facebook
Subscribe to the Maggie Weldon YouTube Channel for more crochet lesson videos
Subscribe to Maggie’s Crochet YouTube Channel for product reviews
Sign Up for My Newsletter
Follow us on Pinterest
Follow us on Twitter


No Comments