
From www.redheart.com
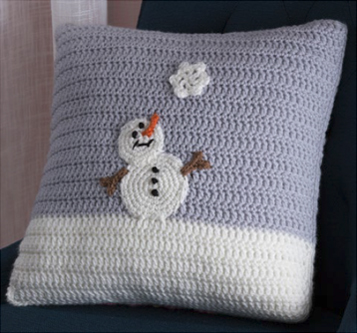
Snowy Day Pillow
Bring back memories of childhood snow days with this endearing crochet pillow. A pretty red bird has lit on her blue hat while snowflakes gently surround her.
Pattern #: LW4677
Designed by: Michele Wilcox
Project Type: Home Decor, Seasonal
Skill Level: Easy
Required Supplies:
- RED HEART® Super Saver®: 1 skein each 316 Soft White A, 341 Light Grey B, 313 Aran C, 706 Perfect Pink D, 885 Delft E, 672 Spring Green F, 324 Bright Yellow G, 319 Cherry Red H, 321 Gold I, 254 Pumpkin J, 360 Café Latte K, and 312 Black L
Note: Only small quantities of G, I, J, K, and L are needed for this project. - Susan Bates® Crochet Hooks: 4mm [US G-6] and 5mm [US H-8]
- Yarn needle
- stitch marker
Additional Supplies Needed:
16” (40.5 cm) square pillow form, red crayon (to shade cheeks), black embroidery floss (for facial features), 8” (20.5 cm) piece of heavy cardboard
Pillow measures 16” x 16” (40.5 x 40.5 cm).
Special Stitches
sc2tog = [Insert hook in next stitch, yarn over and pull up a loop] twice, yarn over and draw through all 3 loops on hook.
sc3tog = [Insert hook in next stitch, yarn over and pull up a loop] 3 times, yarn over and draw through all 4 loops on hook.
sc2tog = [Insert hook in next stitch, yarn over and pull up a loop] twice, yarn over and draw through all 3 loops on hook.
sc3tog = [Insert hook in next stitch, yarn over and pull up a loop] 3 times, yarn over and draw through all 4 loops on hook.
Special Technique
Join with sc = Place a slip knot on hook, insert hook in indicated stitch, yarn over and draw up a loop, yarn over and draw through both loops on hook.
Join with sc = Place a slip knot on hook, insert hook in indicated stitch, yarn over and draw up a loop, yarn over and draw through both loops on hook.
Notes
1. Pillow is made from 2 sides worked back and forth in rows with larger hook.
2. All other pieces are worked separately with smaller hook and sewn to sides of pillow. Fasten off all pieces with long tails for sewing.
3. To change color, work last stitch of old color to last yarn over. Yarn over with new color and draw through all loops on hook to complete stitch. Proceed with new color. Cut old color.
PILLOW
Sides (make 2)
Sides (make 2)
With larger hook and A, ch 50.
Row 1 (right side): Sc in 2nd ch from hook and in each ch across, turn—49 sts.
Row 2: Ch 3 (counts as first dc here and throughout), dc in each st across, turn.
Row 3: Ch 1, sc in each st across, turn.
Rows 4–9: Repeat Rows 2 and 3 three times.
Row 10: Repeat Row 2; change to B, turn.
Row 11: Repeat Row 3.
Rows 12–35: Repeat Rows 2 and 3 twelve times.
Last round (right side): Working in ends of rows, sc evenly across first side changing to A in Row 11 (first A-colored st will be in Row 10); working across opposite side of foundation ch, 3 sc in first ch, sc in each ch across to last ch, 3 sc in last ch; working in ends of rows, sc evenly across other side changing to B in Row 10 (next B-colored st will be in Row 11), 3 sc in first st, sc in each st across to last st, 3 sc in last st; join with slip st in first sc. Fasten off.
Note: Work all remaining pieces with smaller hook. Fasten off with long tails for sewing.
Note: Work all remaining pieces with smaller hook. Fasten off with long tails for sewing.
GIRL
Head and Body
Beginning at top of head, with C, ch 7.
Row 1 (right side): Sc in 2nd ch from hook and each ch across, turn—6 sc.
Rows 2–5: Ch 1, sc in first st, 2 sc in next st, sc in each st to last 2 sts, 2 sc in next st, sc in last st, turn—14 sc.
Rows 6–11: Ch 1, sc in each st across, turn.
Rows 12–15: Ch 1, sc in first st, sc2tog, sc in each st to last 3 sts, sc2tog, sc in last st, turn—6 sc.
Row 16: Ch 1, sc in first 2 sts, sc2tog, sc in last 2 sts, turn—5 sc.
Rows 17 and 18: Ch 1, sc in each st across; change to D at end of Row 18, turn.
Row 19: Ch 1, 2 sc in first st, sc in each st to last st, 2 sc in last st; change to D, turn—7 sc.
Rows 20 and 21: Ch 4, 2 sc in 2nd ch from hook, sc in next 2 ch, sc in each remaining st, turn—15 sc.
Row 22: Ch 1, 2 sc in first st, sc in each st to last st, 2 sc in last st, turn—17 sc.
Rows 23 and 24: Ch 1, sc in each st across, turn. Do not fasten off.
First Arm
Row 1 (right side): Ch 1, sc in first 3 sts; leave remaining sts unworked, turn—3 sc.
Rows 2–10: Ch 1, sc in each st across, turn.
Fasten off.
Rows 2–10: Ch 1, sc in each st across, turn.
Fasten off.
Body
Row 1 (right side): With right side of Row 24 facing, skip first unworked st, join D with sc in next unworked st, sc in next 8 sts; leave remaining sts unworked, turn—9 sc.
Rows 2–10: Ch 1, sc in each st, turn.
Fasten off.
Row 1 (right side): With right side of Row 24 facing, skip first unworked st, join D with sc in next unworked st, sc in next 8 sts; leave remaining sts unworked, turn—9 sc.
Rows 2–10: Ch 1, sc in each st, turn.
Fasten off.
Second Arm
Row 1 (right side): With right side of Row 24 facing, skip next unworked st, join D with sc in next unworked st, sc in remaining sts, turn— 3 sc.
Rows 2–10: Ch 1, sc in each st across, turn.
Row 1 (right side): With right side of Row 24 facing, skip next unworked st, join D with sc in next unworked st, sc in remaining sts, turn— 3 sc.
Rows 2–10: Ch 1, sc in each st across, turn.
Edging
Last Round: Ch 1, working in each st and in ends of rows, sc evenly around arms, body, and head, working 3 sc in each outer corner of arms and changing colors as needed to match each section; join with slip st in first sc.
Fasten off.
Last Round: Ch 1, working in each st and in ends of rows, sc evenly around arms, body, and head, working 3 sc in each outer corner of arms and changing colors as needed to match each section; join with slip st in first sc.
Fasten off.
Ear (make 2)
With C, ch 3.
Row 1: 5 hdc in 3rd ch from hook. Fasten off.
With C, ch 3.
Row 1: 5 hdc in 3rd ch from hook. Fasten off.
Hat
Crown
Beginning at bottom edge, with E, ch 16.
Row 1 (right side): Sc in 2nd ch from hook and in each ch across, turn—15 sc.
Rows 2–5: Ch 1, sc in each st across, turn.
Row 6: Ch 1, sc in first 3 sts, sc2tog, *sc in next 3 sts, sc2tog; repeat from * once, turn—12 sc.
Row 7: Ch 1, sc in each st across, turn.
Row 8: Ch 1, sc in first 2 sts, sc2tog, *sc in next 2 sts, sc2tog; repeat from * once, turn—9 sc.
Row 9: Ch 1, [sc2tog] twice, sc in next st, [sc2tog] twice, turn—5 sc.
Row 10: Ch 1, sc2tog, sc in next st, sc2tog, turn—3 sc. Fasten off.
Brim
With E, ch 5.
Row 1: Sc in 2nd ch from hook and in each ch across, turn—4 sc.
Rows 2–20: Ch 1, working in back loops only, sc in each st across, turn.
Fasten off.
With E, ch 5.
Row 1: Sc in 2nd ch from hook and in each ch across, turn—4 sc.
Rows 2–20: Ch 1, working in back loops only, sc in each st across, turn.
Fasten off.
Scarf
Neck cover
With F, ch 6.
Row 1: Sc in 2nd ch from hook and in each ch across, turn—5 sc.
Rows 2–12: Ch 1, working in back loops only, sc in each st across, turn.
Fasten off.
Neck cover
With F, ch 6.
Row 1: Sc in 2nd ch from hook and in each ch across, turn—5 sc.
Rows 2–12: Ch 1, working in back loops only, sc in each st across, turn.
Fasten off.
Bow
With F, ch 6.
Row 1: Sc in 2nd ch from hook and in each ch across, turn—5 sc.
Rows 2–30: Ch 1, working in back loops only, sc in each st across, turn.
Fasten off.
With F, ch 6.
Row 1: Sc in 2nd ch from hook and in each ch across, turn—5 sc.
Rows 2–30: Ch 1, working in back loops only, sc in each st across, turn.
Fasten off.
Button (make 3)
With G, ch 2.
Round 1: Work 5 sc in 2nd ch from hook; join with slip st in first sc. Fasten off.
With G, ch 2.
Round 1: Work 5 sc in 2nd ch from hook; join with slip st in first sc. Fasten off.
CARDINAL
Body
With H, ch 2.
Round 1 (right side): Work 6 sc in 2nd ch from hook—6 sc. Do not join, work in continuous (spiral) rounds. Place marker on first stitch and move up as each round is completed.
Round 2: Work 2 sc in each st around—12 sc.
Round 3: *Sc in next st, 2 sc in next st; repeat from * twice—18 sc. Do not fasten off.
Head
Continue in rows.
Row 4: Slip st in next st, ch 1, 3 sc in next 2 sts; leave remaining sts unworked, turn—6 sc.
Row 5: Ch 1, sc in first 6 sts, turn.
Row 6: Ch 1, [sc2tog] 3 times, turn—3 sc.
Row 7: Ch 1, sc in first st, sc2tog, turn—2 sc.
Row 8: Ch 1, sc in each st across, turn.
Row 9: Ch 1, sc2tog—1 sc. Fasten off.
Beak
With I, ch 4.
Row 1: Sc in 2nd ch from hook and in each ch across, turn—3 sc.
Row 2: Ch 1, sc3tog—1 sc. Fasten off.
With I, ch 4.
Row 1: Sc in 2nd ch from hook and in each ch across, turn—3 sc.
Row 2: Ch 1, sc3tog—1 sc. Fasten off.
Tail
With H, ch 6.
Row 1: Sc in 2nd ch from hook and in each ch across, turn—5 sc.
Row 2: Ch 1, sc in each st across, turn.
Row 3: Ch 1, sc in first st, sc3tog, sc in last st, turn—3 sc.
Row 4: Ch 1, sc in each st across, turn.
Row 5: Ch 1, sc3tog—1 sc. Fasten off.
With H, ch 6.
Row 1: Sc in 2nd ch from hook and in each ch across, turn—5 sc.
Row 2: Ch 1, sc in each st across, turn.
Row 3: Ch 1, sc in first st, sc3tog, sc in last st, turn—3 sc.
Row 4: Ch 1, sc in each st across, turn.
Row 5: Ch 1, sc3tog—1 sc. Fasten off.
Wing
With H, ch 4.
Row 1 (right side): Slip st in 2nd ch from hook, 2 hdc in next ch, sc in last ch. Fasten off.
Row 1 (right side): Slip st in 2nd ch from hook, 2 hdc in next ch, sc in last ch. Fasten off.
SNOWMAN
Body
With A, ch 2.
Round 1: Work 6 sc in 2nd ch from hook—6 sc. Do not join, work in continuous (spiral) rounds. Place marker on first stitch and move up as each round is completed.
Round 2: Work 2 sc in each st around—12 sc.
Round 3: *Sc in next st, 2 sc in next st; repeat from * around—18 sc.
Round 4: *Sc in next 2 sts, 2 sc in next st; repeat from * around—24 sc.
Round 5: *Sc in next 3 sts, 2 sc in next st; repeat from * around—30 sc.
Round 6: Sc in next 2 sts, *2 sc in next st, sc in next 4 sts; repeat from * 4 times, 2 sc in next st, sc in next 2 sts; join with slip st in first sc—36 sc. Fasten off.
Head
Work Rounds 1–4 of snowman body; join with slip st in first sc at end of Round 4. Fasten off.
Work Rounds 1–4 of snowman body; join with slip st in first sc at end of Round 4. Fasten off.
Carrot
With J, ch 6.
Row 1: Slip st in 2nd ch from hook and in next 3 ch, sc in last ch. Fasten off.
With J, ch 6.
Row 1: Slip st in 2nd ch from hook and in next 3 ch, sc in last ch. Fasten off.
Arm (make 2)
With K, ch 6.
Row 1: Slip st in 2nd ch from hook and in next ch, ch 2, sc in 2nd ch from hook and in same ch as base of ch-2, slip st in last 3 ch. Fasten off.
With K, ch 6.
Row 1: Slip st in 2nd ch from hook and in next ch, ch 2, sc in 2nd ch from hook and in same ch as base of ch-2, slip st in last 3 ch. Fasten off.
SNOWFLAKE (make 10)
With A, ch 6.
Round 1 (right side): Dc in 6th ch from hook (beginning ch count as first dc, ch 2), [ch 2, dc] 4 times in same ch, ch 2; join with slip st in 3rd ch of beginning ch—6 dc and 6 ch-2 spaces.
With A, ch 6.
Round 1 (right side): Dc in 6th ch from hook (beginning ch count as first dc, ch 2), [ch 2, dc] 4 times in same ch, ch 2; join with slip st in 3rd ch of beginning ch—6 dc and 6 ch-2 spaces.
Round 2: (Sc, ch 3, sc) in first ch-2 space, slip st in next dc, *(sc, ch 3, sc) in next ch-2 space, slip st in next dc; repeat from * 3 times, (sc, ch 3, sc) in last ch-2 space; join with slip st in joining slip st of previous round. Fasten off.
FINISHING
Use photograph as a guide for embroidery stitches and placement of pieces. Position all pieces with right side facing. For best results, place and sew pieces in the order listed. To minimize finishing, draw ends of all tails to wrong side of pillow sides.
Use photograph as a guide for embroidery stitches and placement of pieces. Position all pieces with right side facing. For best results, place and sew pieces in the order listed. To minimize finishing, draw ends of all tails to wrong side of pillow sides.
GIRL
Head and Body
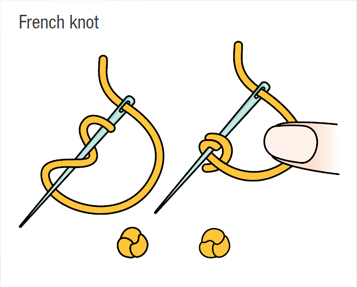
With black embroidery floss, embroider a French knot for each eye, straight stitches for eyebrows and nose, and curved couch stitch for mouth. Color cheeks with red crayon.
Position head and body on front side, aligning lower edges of arms and jumper with Row 1 of front side, and sew to pillow with matching colors and leaving ears unsewn.
Head and Body
With black embroidery floss, embroider a French knot for each eye, straight stitches for eyebrows and nose, and curved couch stitch for mouth. Color cheeks with red crayon.
Position head and body on front side, aligning lower edges of arms and jumper with Row 1 of front side, and sew to pillow with matching colors and leaving ears unsewn.
Braid (make 2)
Wrap K around 8” (20.5 cm) piece of cardboard 9 times. Cut a 12” (30.5 cm) length of K and tie it tightly around wraps at one end of cardboard. Cut wraps at other end.
Fold the bundle in half at tied end so that you have 18 strands; separate into 3 hanks and braid to 3¾” (9.5 cm) or desired length. Tie a short strand of yarn around the bottom of the braid and trim ends evenly. Thread tying tails through pillow on side of head 1” (2.5 cm) above each ear and secure to wrong side of front. Sew braid, if desired, to front side. Top of braids will be hidden under hat.
Hat
Sew crown at top edge of head and braids. Position brim across bottom edge of crown and top edge of head and braids and sew in place.
Sew crown at top edge of head and braids. Position brim across bottom edge of crown and top edge of head and braids and sew in place.
Scarf
Tie bow around center of neck cover and sew in scarf place between head and body.
Tie bow around center of neck cover and sew in scarf place between head and body.
Buttons
Sew buttons evenly spaced apart on front of body.
Bird
With L, embroider French knot eye on head and straight stitches along left edge of Rows 4 and 5. Sew wing to Round 1 of body. Place body on top of hat, position beak to head, tail to right side of body, and sew all pieces in place.
With L, embroider French knot eye on head and straight stitches along left edge of Rows 4 and 5. Sew wing to Round 1 of body. Place body on top of hat, position beak to head, tail to right side of body, and sew all pieces in place.
Snowman
With L, embroider 2 French knot eyes on head, straight stitches for mouth, and 3 French knot buttons evenly spaced in center of body. Sew body and head to back side, placing lower end of body on A-colored section. Sew carrot on head and arms on each side of body.
With L, embroider 2 French knot eyes on head, straight stitches for mouth, and 3 French knot buttons evenly spaced in center of body. Sew body and head to back side, placing lower end of body on A-colored section. Sew carrot on head and arms on each side of body.
Snowflakes
Randomly scatter 9 pieces across front side and sew in place; sew last piece on back side above and to the right of snowman.
Randomly scatter 9 pieces across front side and sew in place; sew last piece on back side above and to the right of snowman.
Sides
Hold front and back sides with wrong sides together.
Round 1: With larger hook and working in inner loops, join B with sc in any B-colored st of last row, sc in each st around, working 3 sc in center st of each 3-sc group, changing color as needed, and inserting pillow form before 4th side is completed; join with slip st in first sc. Fasten off.
Weave in ends.
ABBREVIATIONS
A, B, C = Color A, Color B, Color C, etc.; ch = chain; dc = double crochet; hdc = half double crochet; sc = single crochet; st(s) = stitch(es); ( ) = work directions in parentheses into same st; [ ] = work directions in brackets the number of times specified; * = repeat whatever follows the * as indicated.
A, B, C = Color A, Color B, Color C, etc.; ch = chain; dc = double crochet; hdc = half double crochet; sc = single crochet; st(s) = stitch(es); ( ) = work directions in parentheses into same st; [ ] = work directions in brackets the number of times specified; * = repeat whatever follows the * as indicated.
Visit my Website
Join me on Facebook
Subscribe to the Maggie Weldon YouTube Channel for more crochet lesson videos
Subscribe to Maggie’s Crochet YouTube Channel for product reviews
Sign Up for My Newsletter
Follow us on Pinterest
Follow us on Twitter
No Comments