From www.RedHeart.com
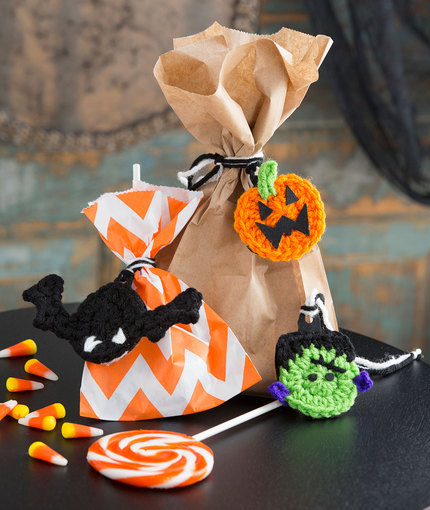
Halloween Gift Trims Free Crochet Pattern
Pattern Number: LW4921
Designed By: Salena Baca
Skill Level: Easy
Required Supplies:
RED HEART® Super Saver®: 1 skein 254 Pumpkin A, 1 skein 312 Black B, 1 skein 672 Spring Green C, 1 skein 356 Amethyst D, 1 skein 316 Soft White E
Susan Bates® Crochet Hook: 5.5 mm [US I-9]
Yarn needle
Additional Supplies Needed:
1 sheet black felt, hand-held hole punch, fabric scissors, hot glue gun (use adult supervision)
Treats for special people deserve a cute trim! Crochet the Pumpkin, Frankenstein and Bat to decorate bags of treats or to add a bit of spookiness around the house during the Halloween season.
Gauge/Tension: GAUGE: 2 rounds hdc worked in pattern = 2.25” (5.5 cm). CHECK YOUR GAUGE. Use any size hook to obtain the gauge.
Finished Sizes: Pumpkin 2.25” x 2.75” (5.5 cm x 7 cm), Frankenstein 2.25” x 3” (5.5 cm x 7.5 cm), Bat 2.25” x 5” (5.5 cm x 12.5 cm)
Special Stitches
picot = ch 3, slip st into first ch made.
sc2tog = [draw up a loop in next st] twice, yarn over and draw through all 3 loops on hook.
Special Technique
Magic ring: Wrap yarn into a ring, ensuring that the tail falls behind the working yarn. Grip ring and tail firmly between middle finger and thumb. Insert hook through center of ring, yarn over (with working yarn) and draw up a loop. Work stitches of first round in the ring. After the first round of stitches is worked, pull gently, but firmly, on tail to tighten ring.
PUMPKIN
Round 1 (Right Side): With A, form a magic ring, ch 2 (counts as first hdc), work 9 hdc in ring; slip st in top of ch-2 to join—10 hdc.
Round 2: Ch 1 (does not count as a st), 2 sc into each of next 2 sts, 2 dc into each of next 8 sts, slip st in top of ch-1 to join; fasten
off—20 sts.
Pumpkin Stem
With C, leave a 6” (15 cm) tail, ch 6, hdc into second ch from hook, sc into next 4 sts; fasten off, leaving a 6” (15 cm) tail. Use tail
ends to fasten Stem to Pumpkin, attaching sc portion on Round 2 with Right Side facing.
Pumpkin Face
Use fabric scissors to cut two triangle eyes and one jack-o-lantern mouth from the black felt. Referring to photograph for placement, arrange felt pieces. Using hot glue gun, carefully fasten each piece into place.
FRANKENSTEIN
Round 1 (Right Side): With C, form a magic ring, ch 2 (counts as first hdc now and throughout), work 9 hdc in ring; slip st in top of ch-2 to join—10 hdc.
Round 2: Ch 2, hdc in same st, 2 hdc in each st around; slip st in top of ch-2 to join; fasten off—20 hdc.
Frankenstein Hair
With Right Side facing, attach B in any st from Round 2, ch 2 (counts as first dc), dc in the next st, hdc in the next 4 sts, dc into the
next st, ch 2 and slip st in the next st; fasten off— 8 sts.
Frankenstein Bolt
With Right Side facing, attach D 2 sts below right side of Hair; ch 4, slip st into same space; fasten off. With Right Side facing, attach D 2 sts below left side of Hair; ch 4, slip st into same sp; fasten off.
Frankenstein Stitches
With Right Side facing, attach B and cut 12” (30.5 cm) of yarn. Referring to photograph for placement, use crochet hook or yarn needle to add Frankenstein stitches. Fasten off on Wrong Side.
Frankenstein Eyes
Use fabric scissors and hole punch to cut two flat-topped circles from the black felt.
Referring to photograph for placement, arrange felt pieces. Using hot glue gun, carefully fasten each piece into place.
BAT
Round 1 (Right Side): With B, form a magic ring, ch 2 (counts as first hdc now and throughout), work 9 hdc in ring; slip st in top of ch-2 to join—10 hdc.
Round 2: Ch 2, hdc in same st, 2 hdc in each st around; slip st in top of ch-2 to join; fasten off—20 hdc.
Bat Wings (Make 2)
With B, leave a 6” (15 cm) tail; ch 7, turn.
Row 1: Skip 1 ch, sc2tog over next 2 ch, (hdc, picot, hdc) in the next ch, sc in the next ch, (hdc, picot, hdc) in the next ch, sc in the last ch; fasten off.
With Right Side facing and referring to photograph for placement, use end tail to fasten Left Wing to Round 2 of Bat. Flip Right Wing over so it mirrors Left Wing, skip 5 sts on the bottom, and fasten Right Wing to Bat.
Bat Teeth
With E, cut 24” (61 cm) of yarn. With Right Side of Bat facing and referring to photograph for placement, use crochet hook or yarn needle to add Teeth. Fasten off on Wrong Side.
FINISHING (all)
Use fabric scissors to cut out the following shapes from your black felt for each Trim:
• Backing: 2” (5 cm) circle
• Hanger: 1.25” (3 cm) long x ¾” (2 cm) wide rounded-top rectangle (use hole punch to cut a circle out of the rounded-top end)
Arrange Backing and Hanger, so that Hanger is between Backing and Trim, and punched hole is exposed on top. Using hot glue gun, carefully fasten Trim to felt pieces. Cut 15” (38 cm) of B and E. Hold together and knot evenly through punched hole. Use tails to tie onto gift bag.
ABBREVIATIONS
A, B, C = Color A, Color B, Color C etc.;
ch = chain;
cm = centimeters;
dc = double crochet;
hdc = half double crochet;
mm = millimeters;
sc = single crochet;
sp = space;
st(s) = stitch(es);
[ ] = work directions in brackets the number of times specified;
* or ** = repeat whatever follows the * or ** as indicated.
No Comments