From www.RedHeart.com
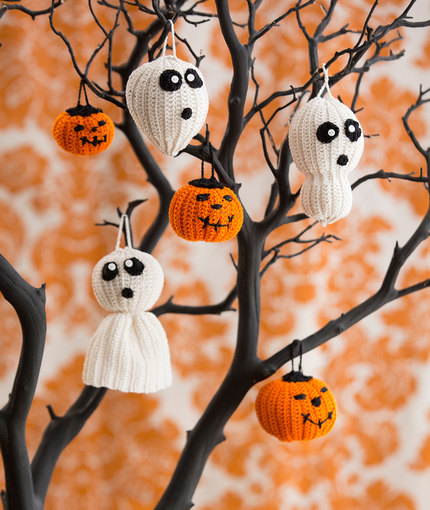
Halloween Tree of Spookiness Free Crochet Pattern
Pattern Number: LC4914
Designed By: Cristina Mershon
Skill Level: Easy
Required Supplies:
AUNT LYDIA’S® Classic Crochet Thread, Size 10: 1 ball 210 Antique White A, 1 ball 12 Black B, 1 ball 431 Pumpkin C
Susan Bates® Steel Crochet Hook: 1.5 mm [US 7]
Additional Supplies Needed:
Thread needle, polyester fiberfill, six ¼” (7mm) white buttons, white sewing thread, ornament hangers
Create a spooky tree using a branch or use these ornaments wherever a little Halloween fun is needed. Choose from three Ghost variations and two sizes of Jack o’ Lanterns.
Gauge/Tension: GAUGE: Gauge is not critical for these projects.
Special Technique
Adjustable ring: Wrap yarn into a ring, ensuring that the tail falls behind the working yarn. Grip ring and tail firmly between middle finger and thumb. Insert hook through center of ring, yarn over (with working yarn) and draw up a loop. Work stitches of first round in the ring. After the first round of stitches is worked, pull gently, but firmly, on tail to tighten ring.
Ghost ball measures 3.5” (9 cm) in diameter.
GHOST BALL
With A, ch 41.
Row 1 (Right Side): Sc in second ch from hook, sc in next 4 ch, dc in next 20 ch, sc in last 15 ch; turn—40 sts.
Row 2: Working in back loops only, ch 1, sc in same beginning sc, sc in next 14 sc, dc in next 20 dc, sc in last 5 sc; turn—40 sts.
Row 3: Working in back loops only, ch 1, sc in same beginning sc, sc in next 4 sc, dc in next 20 dc, sc in last 15 sc; turn—40 sts.
Rows 4-30: Repeat Rows 2-3 13 times, then Row 2 once.
Row 31: Work a row of sc joining Row 30 to Row 1 as follows: Holding the two rows together with Right Side facing, ch 1, insert hook under the first loop of the opposite side of the foundation ch and under the front loop of the first sc of Row 30, draw up a loop, complete sc; continue in this fashion, working a sc over each set of two stitches across—40 sc.
Ghost Eyes (Make 2)
With B, make a Magic Loop. Ch 3 (counts as first dc), 16 dc in ring; slip st in top of ch-3 to join; fasten off—17 dc.
Ghost Mouth
With B, make a Magic Loop. Ch 1, 10 sc in ring; slip st in top of first sc to join; fasten off—10 sc.
Finishing
Using needle, sew one of the end of the ornament closed. Fill the ornament with polyester fiberfill, then sew the other end closed. Join A to the middle of the ornament at the top; ch 20, slip st in first ch to form a loop. Referring to photograph for placement, sew the Loop to the top of the Ghost Ball; place the buttons on the Eyes and sew the Eyes to the Ghost Ball; sew the Mouth to the Ghost Ball, not too close to the Eyes. Fasten off and weave in all ends.
Floaty Ghost measures 4” (10 cm) wide x 6” (15 cm) long.
FLOATY GHOST
With A, ch 51.
Row 1 (Right Side): Sc in second ch from hook, sc in next 4 ch, dc in next 15 ch, sc in next 5 ch, dc in last 25 ch; turn—50 sts.
Row 2: Working in back loops only, ch 3 (counts as first dc), dc in next 24 dc, sc in next 5 sc, dc in next 15 dc, sc in last 5 sc; turn—50 sts.
Row 3: Working in back loops only, ch 1, sc in same beginning sc, sc in next 4 sc, dc in next 15 dc, sc in next 5 sc, dc in last 25 dc;
turn—50 sts.
Rows 4-30: Repeat Rows 2-3 13 times, then Row 2 once.
Row 31: Work a row of sc joining Row 30 to Row 1 as follows: Holding the two rows together with Right Side facing, ch 1, insert hook under the first loop of the opposite side of the foundation ch and under the front loop of the first sc of Row 30, draw up a loop, complete sc; continue in this fashion, working a sc over each set of two stitches across—50 sc.
Ghost Eyes and Ghost Mouth
Make same as for Ghost Ball.
Finishing
Using needle, sew one of the end of the ornament closed. Fill the ornament with polyester fiberfill, then sew the other end closed. Join A to the middle of the ornament at the top; ch 20, slip st in first ch to form a loop. Referring to photograph for placement, sew the Loop to the top of the Floaty Ghost; place the buttons on the Eyes and sew the Eyes to the Floaty Ghost; sew the Mouth to the Floaty Ghost, not too close to the Eyes.
Fasten off and weave in all ends.
Double Ball Ghost measures 3” (7.5 cm) wide by 5” (12.5 cm) long.
DOUBLE BALL GHOST
With A, ch 46.
Row 1 (Right Side): Sc in second ch from hook, sc in next 4 ch, dc in next 10 ch, sc in next 5 ch, dc in next 20 ch, sc in last 5 ch; turn—45 sts.
Row 2: Working in back loops only, ch 1, sc in same beginning sc, sc in next 4 sc, dc in next 20 dc, sc in next 5 sc, dc in next 10 dc,
sc in last 5 sc; turn—45 sts.
Row 3: Working in back loops only, ch 1, sc in same beginning sc, sc in next 4 sc, dc in next 10 dc, sc in next 5 sc, dc in next 20 dc,
sc in last sc; turn—45 sts.
Rows 4-28: Repeat Rows 2-3 12 times, then Row 2 once.
Row 29: Work a row of sc joining Row 28 to Row 1 as follows: Holding the two rows together with Right Side facing, ch 1, insert hook under the first loop of the opposite side of the foundation ch and under the front loop of the first sc of Row 28, draw up a loop, complete sc; continue in this fashion, working a sc over each set of two stitches across—45 sc.
Ghost Eyes and Ghost Mouth
Make same as for Ghost Ball.
Finishing
Using needle, sew one of the end of the ornament closed. Fill the ornament with polyester fiberfill, then sew the other end closed. Join A to the middle of the ornament at the top; ch 20, slip st in first ch to form a loop. Referring to photograph for placement, sew the Loop to the top of the Double Ball Ghost; place the buttons on the Eyes and sew the Eyes to the Double Ball Ghost; sew the Mouth to the Double Ball Ghost, not too close to the Eyes. Fasten off and weave in all ends.
Big Jack-o-Lantern measures 3” (7.5 cm) in diameter.
BIG JACK O’ LANTERN
With C, ch 31.
Row 1 (Right Side): Sc in second ch from hook, sc in next 4 ch, dc in next 20 ch, sc in last 5 ch; turn—30 sts.
Row 2: Working in back loops only, ch 1, sc in same beginning sc, sc in next 4 sc, dc in next 20 dc, sc in last 5 sc; turn—30 sts.
Rows 3-40: Repeat Row 2.
Row 41: Work a row of sc joining Row 40 to Row 1 as follows: Holding the two rows together with Right Side facing, ch 1, insert hook under the first loop of the opposite side of the foundation ch and under the front loop of the first sc of Row 40, draw up a loop, complete sc; continue in this fashion, working a sc over each set of two stitches across—30 sc.
Medium Jack-o-lantern measures 2.5” (6.5 cm) in diameter.
MEDIUM JACK O’ LANTERN
With C, ch 26.
Row 1 (Right Side): Sc in second ch from hook, sc in next 4 ch, dc in next 15 ch, sc in last 5 ch; turn—25 sts.
Row 2: Working in back loops only, ch 1, sc in same beginning sc, sc in next 4 sc, dc in next 15 dc, sc in last 5 sc; turn—25 sts.
Rows 3-36: Repeat Row 2.
Row 37: Work a row of sc joining Row 36 to Row 1 as follows: Holding the two rows together with Right Side facing, ch 1, insert hook under the first loop of the opposite side of the foundation ch and under the front loop of the first sc of Row 36, draw up a loop, complete sc; continue in this fashion, working a sc over each set of two stitches across—25 sc.
Small Jack-o-Lantern measures 2” (5 cm) in diameter.
SMALL JACK O’ LANTERN
With C, ch 21.
Row 1 (Right Side): Sc in second ch from hook, sc in next 4 ch, dc in next 10 ch, sc in last 5 ch; turn—20 sts.
Row 2: Working in back loops only, ch 1, sc in same beginning sc, sc in next 4 sc, dc in next 10 dc, sc in last 5 sc; turn—20 sts.
Rows 3-30: Repeat Row 2.
Row 31: Work a row of sc joining Row 30 to Row 1 as follows: Holding the two rows together with Right Side facing, ch 1, insert hook under the first loop of the opposite side of the foundation ch and under the front loop of the first sc of Row 30, draw up a loop, complete sc; continue in this fashion, working a sc over each set of two stitches across—20 sc.
FOR ALL SIZES
Jack-o-Lantern Topper
With B, ch 6, join with slip st in first ch to form ring.
Round 1: Ch 3 (counts as first dc), 11 dc in ring; slip st in top of ch-3 to join—12 dc.
Round 2: Ch 1, (sc, ch 3, sc) in same beginning dc, [sc in next dc, (sc, ch 3, sc) in next dc] 5 times, sc in last dc; join with slip st
in top of first sc—18 sc, 6 ch-3 loops.
Join B to the middle of the Topper; ch 20, slip st in first ch to form a loop. Sew Topper to the top of the Pumpkin; fasten off.
Finishing
Using needle, sew one of the end of the ornament closed. Fill the ornament with polyester fiberfill, then sew the other end closed. Sew the Pumpkin Topper to the ornament and weave in all ends. Referring to photograph for placement, embroider the Eyes, Nose, and Mouth to make the Jack O’ Lantern.
ABBREVIATIONS
A, B, C = Color A, Color B, Color C;
ch = chain;
cm = centimeters;
dc = double crochet;
mm = millimeters;
sc = single crochet;
st(s) = stitch(es);
( ) = work all directions in parentheses in the indicated stitch or space;
[ ] = work directions in brackets the number of times specified;
* or ** = repeat whatever follows the * or ** as indicated.

No Comments