From www.RedHeart.com
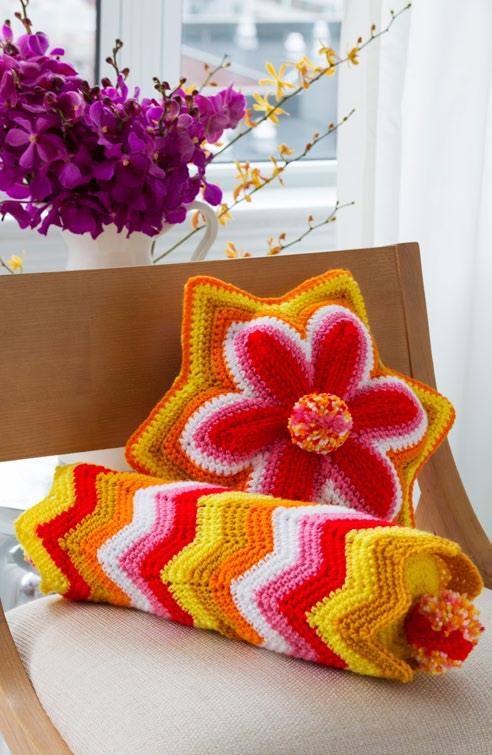
Brighter Days Pillows Free Crochet Pattern
Pattern #: LW4630
Designed by: Urmie D Seenarine
Skill Level: Intermediate
Modern day retro crochet pillows look great in these bright colors or in any colors that will complement your room and express your personality! Use them on a chair, bed, sofa or bench for great hand-crafted style. This pattern uses America’s favorite yarn, Super Saver Economy.
Materials:
RED HEART® Super Saver®:
Booster Pillow: 1 skein each of 324 Bright Yellow A; 390 Hot Red B; 321 Gold C; 254 Pumpkin D; 311 White E; and 706 Perfect Pink F
Star Pillow: 1 skein each of 324 Bright Yellow A; 390 Hot Red B; 321 Gold C; 254 Pumpkin D; 311 White E; and 706 Perfect Pink F
Susan Bates® Crochet Hook: 5.5 mm [I-9 US]
Pom-pom maker
Yarn needle
Stitch markers
Sewing needle and matching sewing thread
Bolster Pillow: 18” (45.5 cm) long bolster pillow form
Star Pillow: Polyfill stuffing
Gauge/Tension: GAUGE: 14 sts (1 repeat) = 3½” (7.5 cm); 9 rows = 4” (10 cm) in Booster Pillow pattern. 10 sts = 4” (10 cm) in Star Pillow pattern. CHECK YOUR GAUGE. Use any size hook to obtain the gauge given.
Bolster pillow measures 22” (56 cm) long x 18” (45.5 cm) around.
Star Pillow measures 17” (43 cm) in diameter at widest point.
Special Stitches
single crochet 2 together (sc2tog): [Insert hook in next st, yarn over, draw yarn through st] twice, yarn over, draw yarn through 3 loops on hook.
single crochet 3 together (sc3tog): [Insert hook in next st, yarn over, draw yarn through st] 3 times, yarn over, draw yarn through 4 loops on hook.
Booster Pillow Color Sequence
Work in the following color sequence throughout: *3 rounds each of A, B, C**, D, E, F; repeat from * once; repeat from * to ** once.
Star Pillow Color Sequence Work in the following color sequence: 2 rows each of B, F, E, D, C, A.
BOLSTER PILLOW
Cover
With A, ch 70 and without twisting ch, join into a ring with slip st in first ch.
Round 1 (right side): Ch 1, sc in in each of first 5 ch, *3 sc in next ch, sc in each of next 5 ch, sc3tog over next 3 ch**, sc in each of next 5 ch; repeat from * around, ending last rep at **, join with slip st in first sc – 5 repeats.
Round 2: Slip st in next sc, ch 1, sc in in each of first 5 sts, *3 sc in next sts, sc in each of next 5 sts, sc3tog over next 3 sts**, sc in each of next 5 sts; repeat from * around, ending last rep at **, join with slip st in first sc.
Rounds 3-45: Repeat Round 2, in color sequence listed above. Fasten off.
End Circle (make 2)
With E, make an adjustable ring.
Round 1: Ch 2 (counts as hdc), 13 hdc in ring; join with slip st in top of beginning ch-2 – 14 hdc.
Round 2: Ch 1, 2 sc in each st around; join with a slip st in first sc – 28 sc.
Round 3: Ch 1, sc in each st around; join with slip st in first sc.
Round 4: Repeat Round 3.
Round 5: Ch 1, 2 sc in first st, *sc in each of next 2 sts, 2 sc in next st, [sc in next st, 2 sc in next st] twice; repeat from * around; join with a slip st in first sc – 40 sc.
Round 6: Ch 1, sc in each st around, join with slip st, in first sc; join with a slip st in first sc.
Round 7: Repeat round 6 Round 8: Ch 1, sc in each of next 3 sts, *2 sc in next st**, sc in next 3sts; rep from * around ending last repeat at **, join with a slip st in first sc – 50 sc. Fasten off.
FINISHING
With all 6 colors, make two 3” (7.5 cm) pompoms. Sew one pompom to center of each End Circle. With sewing needle and matching sewing thread, sew End Circles to ends of pillow form. Insert pillow form into Cover, with equal amounts of fabric extending over each end, tack Cover to End Circles.
STAR PILLOW
Cover Half (make 2)
With B, ch 143.
Row 1 (right side): Sc in 2nd ch from hook (place marker), sc in each of next 9 ch, *3 sc in next ch (peek made), sc in each of next 10 ch**, sc3tog over next 3 ch (valley made, place marker), sc in each of next 10 ch; repeat from * around, ending last repeat at ** (place marker in last st), turn – 6 peeks; 7 markers for 5 valleys and ends of row.
Row 2: Ch 1, sc2tog over first 2 sts, sc in each of next 9 sts, *3 sc in next st, sc in each of next 10 sts**, sc3tog over next 3 sts, sc in each of next 10 sts; repeat from * across, ending last repeat at **, sc in each of next 9 sts. sc2tog over last 2 sts, turn. Fasten off B, leaving a sewing length, join F.
Rows 3-12: Working in color sequence as listed above, Repeat Row 2. Fasten off, leaving a sewing length.
Assembly
*On wrong side, bring 2 markers of adjacent valleys together, with sewing needle and thread, sew foundation ch together from peek to valley point; repeat from * around, joining each section from peek to valley together forming 6 points. Sew center together. With matching sewing lengths, sew sides of Cover Half together across
ends of rows. Sew other Cover Half in same manner.
Edging
With wrong sides of two Cover Halves together, matching sts, working through double thickness, join D with slip st in center sc of any point, ch 1, 3 sc in center sc of point, *sc in each of next 10 sc, sc3tog over next 3 sts, sc in each of next 10 sts**, 3 sc in next st; repeat from * 4 times, stuff pillow with polyfill stuffing, repeat from * to ** once, join with slip st in first sc. Fasten off.
Weave in ends.
ABBREVIATIONS
A, B, C, D, E, F = color A, B, C, D, E, F;
ch = chain;
hdc = half double crochet;
sc = single crochet;
st(s) = stitch(es);
() = work directions in parentheses into same st;
[ ] = work directions in brackets the number of times specified;
* or ** = repeat whatever follows the * or ** as indicated.
No Comments