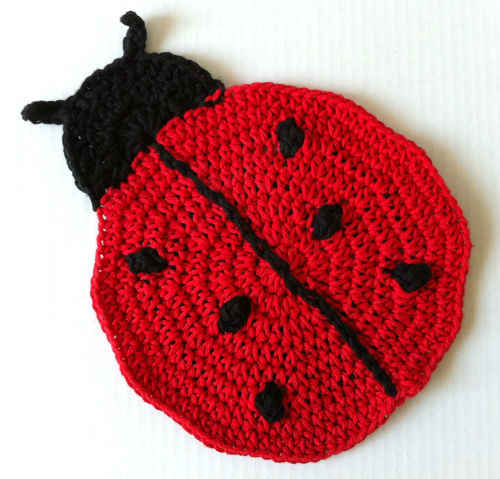
Once again Kathleen Stuart has created a charming crochet dishcloth for all of us to enjoy. Kathleen wrote: “With the idea of better weather approaching, I came up with the idea of a cute ladybug. The ladybug dishcloth is a quick circular dishcloth made with half double crochet and popcorn stitches. I used surface crochet to create the center line for the bug. This dishcloth will be fun to use as the weather gets warmer and we actually get to see some of the real ladybugs. I do like coming up with some whimsical ideas when I crochet, they make me smile!
Thank you Kathleen.
Follow me onto crochet dishcloth #131 and the rest of the story…
Lady Bug Dishcloth
Original Design By: Kathleen Stuart
Copyright 2011 Maggie Weldon
Skill: Easy
Size: About 8” wide and 9” long.
Materials: Worsted Weight Cotton Yarn: Red – 1 oz, 48 yds (28 g, 44 m); Black – ½ oz, 24 yds (14 g, 22 m) (Lily Sugar ‘n Cream – Red #095, Black #002)
Crochet Hook: Size J-10 (6.00 mm)
TO CHANGE COLORS
Work last stitch before color change to last step, with new color yo and pull new color through remaining loops on hook. Drop unused color to wrong side. Do not work over unused color.
*For Further Assistance with Changing Colors, see our Help Section on the Website www.MaggiesCrochet.com
Special Stitches
Popcorn (pc): Work 3 dc in next st, remove hook from lp, insert hook, front to back, in top of first dc of 3 dc group, draw dropped lp through first dc, ch 1 to tighten.
Note: Popcorn stitches are worked in Black. Carry Black yarn behind Red on working row. Carry Black yarn behind Red for Rows 4 and 5 also, so that it does not show. You could cut the Black yarn when done in Row 3 and then add again in Row 6.
DISHCLOTH
Body
Rnd 1: (Right Side) Starting at center, with Red, ch 4, join with sl st in first ch to form a ring; ch 2 (counts as first hdc now and throughout), 11 hdc in ring; join with sl st to first hdc. (12 hdc)
Rnd 2: Ch 2, hdc in same st as joining, [2 hdc in next hdc] around; join with sl st to first hdc. (24 hdc)
Rnd 3: Ch 2, [2 hdc in next hdc, hdc in next hdc] twice, hdc in next hdc, change to Black, pc in same st as last hdc, pick up Red, [hdc in next hdc, 2 hdc in next hdc] 5 times, hdc in next 2 hdc, change to Black, pc in same st as last hdc, pick up Red, [hdc in next hdc, 2 hdc in next hdc] 3 times; join with sl st to first hdc. (2 pc, 34 hdc)
Rnd 4: Ch 2, hdc in next hdc, 2 hdc in next hdc, [hdc in next 2 sts, 2 hdc in next st] around; join with sl st to first hdc. (48 hdc)
Rnd 5: Ch 2, hdc in next 2 hdc, 2 hdc in next hdc, [hdc in next 3 hdc, 2 hdc in next hdc] around; join with sl st to first hdc. (60 hdc)
Rnd 6: Ch 2, hdc in next 3 hdc, 2 hdc in next hdc, * hdc in next 2 hdc, change to Black, pc in next hdc, pick up Red, hdc in next hdc, 2 hdc in next hdc, [hdc in next 4 hdc, 2 hdc in next hdc] twice; rep from * twice, hdc in next 2 hdc, change to Black, pc in next hdc, pick up Red, hdc in next hdc, 2 hdc in next hdc, hdc in next 4 hdc, 2 hdc in next hdc; join with sl st to first hdc. (4 pc, 68 hdc)
Rnd 7: Ch 2, hdc in next 4 hdc, 2 hdc in next hdc, [hdc in next 5 sts, 2 hdc in next st] around; join with sl st to first hdc. (84 hdc)
Rnd 8: Ch 2, hdc in next 5 hdc, 2 hdc in next hdc, [hdc in next 6 hdc, 2 hdc in next hdc] around; join with sl st to first hdc. Finish off and weave in ends. (96 hdc)
Head
Row 1: With right side facing, join Black with sl st in 3rd to last hdc in Rnd 8, skip next 2 hdc, 7 dc in next hdc (1st hdc of Rnd 8 ), skip next 2 hdc, sl st in next hdc (4th hdc of Rnd 8 ), sl st in next 2 hdc on Rnd 8.
Row 2: Turn, working in Row 1, dc in first dc, 2 dc in next 6 dc, on Rnd 8, skip next 2 hdc, sl st in next 2 hdc.
Row 3: Turn, hdc in next 2 dc, 2 hdc in next dc, hdc in next 2 dc, * ch 5, sc in 2nd ch from hook, sc in next 3 ch (antenna), hdc in same dc as last hdc *, hdc in next dc, 2 hdc in next dc, hdc in next 2 dc; rep from * to *, [hdc in next dc, 2 hdc in next dc] twice, on Rnd 8 skip next hdc, sl st in next hdc. Finish off and weave in ends.
Finishing
With Black, surface crochet center line. Start in first hdc of Rnd 8 of Body, where center Head is. Attach a slip knot at back of first st of Rnd 8, from front of work, pull up the slip knot from the back (the yarn will be feeding from the back)and work sl sts in the ends of each row across the body of the ladybug. Finish off and weave in ends.
All Rights Reserved ©2011 Maggie Weldon
Enjoy,
Maggie


Thank You for this cute Ladybug. I love it!
I also love Lady Bug items as long as they don’t look like a ugly bug! This is going to be my new coasters. I’m going to make 1 for a friend that entertain’s, it’ll be a eye catcher!
I also crocheted a plain one, sewed them together around the edges, made a red fabric insert and stuffed it full of fiberfill, and turned it into a soft pillow for my 2-year old nephew who LOVES bugs. It was a great birthday present. =)
I love it! I bet that is super cute! We would love to see it! Thank you for sharing!