While most needlework originated out of necessity, it flourishes out of a need to create something beautiful and a need to share that beauty with loved ones.
Judging by the great condition of many vintage potholders, I don’t think they were used in cooking that much. Working them with crochet cotton thread makes them rather unsafe in protecting your hands from hot pans. If you want to actually use these vintage potholder designs in cooking I highly suggest lining the inside with a store bought potholder or layers of cotton quilt batting. Another good idea would be to set hot pans on the backside of your potholder to protect the front from scorch marks. I have seen a few old potholders that have a cotton backing added to them that shows signs of scorching. The front of the potholder is like new but the back shows all the ware and tear from use.
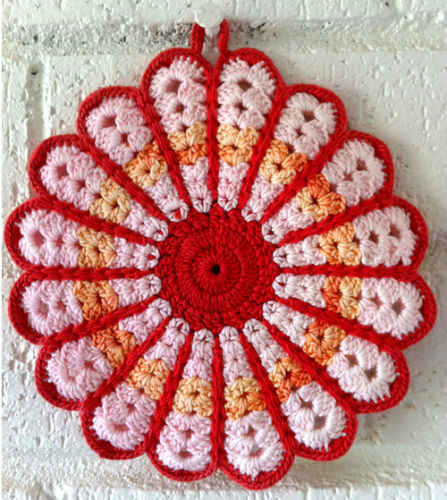
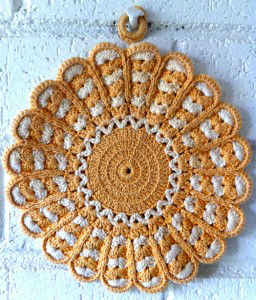
This Daisy Potholder looks very different, working in a variety of thread sizes and colors. The two potholders shown here are the same exact pattern – just different crochet cotton thread.
FP280
Edited By: Maggie Weldon
Copyright 2010 Maggie Weldon
Skill: Easy
Size: About 6 inches diameter
Materials: Size 10 Thread: Yellow & White
½” Ring (for hanger)
Crochet Hook: Steel size 7.
JOINING WITH SC
When instructed to join with sc, begin with sl knot on hook, insert hook in st or sp indicated, yo and pull up a loop, yo and draw through both loops on hook.
TO CHANGE COLORS
Work last stitch before color change to last step, with new color yo and pull new color through remaining loops on hook. Drop unused color to wrong side. Do not work over unused color.

*For Further Assistance with Changing Colors, see our Help Section on the Website www.MaggiesCrochet.com
Special Stitches
V-Stitch (v-st): (dc, ch 2, dc) in same st or sp.
Shell: (2 dc, ch 2, 2 dc) in same st or sp.
Shell2: (3 dc, ch 2, 2 dc) in same st or sp.
Shell3: (4 dc, ch 2, 4 dc) in same st or sp.
CENTER (Make 2)
Rnd 1: (Right Side) Starting at center, with Yellow, ch 8, sl st in first ch to form ring; ch 3 (counts as first dc now and throughout), 19 dc in ring; join with sl st to first dc. (20 dc)
Rnds 2-3: Ch 3, 2 dc in next dc, (dc in next dc, 2 dc in next dc) around; join. (30, 45 dc)
Rnd 4: Ch 3, dc in next dc, 2 dc in next dc, (dc in next 2 dc, 2 dc in next dc) around; join. (60 dc)
Finish off Yellow and weave in ends.
FRONT PETALS
Rnd 1: With right side facing, join White with sl st to any dc, ch 5 (counts as first dc and ch 2)
dc in same st as joining, skip next 2 dc, (v-st in next dc, skip next 2 dc) around; join. Finish off White and weave in ends. (20 petals)
Rnd 2: With right side facing, join Yellow with sl st to any ch-2 sp, ch 3, (dc, ch 2, 2 dc) in same sp, ch 1, (Shell in next v-st, ch 1) around; join. Finish off Yellow and weave in ends.
Rnd 3: With right side facing, join White with sl st to any ch-2 sp, ch 3, (dc, ch 2, 2 dc) in same sp, ch 1, (Shell in next Shell, ch 1) around; join. Finish off White and weave in ends.
Rnd 4: With right side facing, join Yellow with sl st to any ch-2 sp, ch 3, (2 dc, ch 2, 3 dc) in same sp, ch 1, (Shell2 in next Shell, ch 1) around; join. Finish off Yellow and weave in ends.
Rnd 5: With right side facing, join White with sl st to any ch-2 sp, ch 3, (2 dc, ch 2, 3 dc) in same sp, ch 1, (Shell2 in next Shell, ch 1) around; join. Finish off White and weave in ends.
Rnd 6: With right side facing, join Yellow with sl st to any ch-2 sp, ch 3, (3 dc, ch 2, 4 dc) in same sp, ch 1, (Shell3 in next Shell, ch 1) around; join. Finish off Yellow and weave in ends.
Rnd 7: With right side facing, join White with sl st to any ch-2 sp, ch 3, 8 dc in same sp, ch 1, (9 dc in next Shell, ch 1) around; join. Finish off and weave in ends.
BACK PETALS
Rnd 1: On second Center, with right side facing, join White with sl st to any dc, ch 5 (counts as first dc and ch 2) dc in same st as joining, skip next 2 dc, (v-st in next dc, skip next 2 dc) around; join. (20 petals)
Rnd 2: Sl st to ch-2 sp, ch 3, (dc, ch 2, 2 dc) in same sp, ch 1, (Shell in next v-st, ch 1) around; join.
Rnd 3: Sl st to ch-2 sp, ch 3, (dc, ch 2, 2 dc) in same sp, ch 1, (Shell in next Shell, ch 1) around; join.
Rnds 4-5: Sl st to ch-2 sp, ch 3, (2 dc, ch 2, 3 dc) in same sp, ch 1, (Shell2 in next Shell, ch 1) around; join.
Rnd 6: Sl st to ch-2 sp, ch 3, (3 dc, ch 2, 4 dc) in same sp, ch 1, (Shell3 in next Shell, ch 1) around; join.
Rnd 7: Sl st to ch-2 sp, ch 3, 8 dc in same sp, ch 1, (9 dc in next Shell, ch 1) around; join.
Petal Outline
Rnd 1: With right sides facing (wrong sides together) and Front facing, join Yellow with sc to Rnd 7 join; sc in next 8 sc, ch 1, working down Rnds, (sc in next ch-1 sp, ch 1) 4 times, working up Rnds in same ch-1 sps, (sc in next ch-1 sp, ch 1) 4 times, * working around outside, sc in next 9 dc, ch 1, working down Rnds, (sc in next ch-1 sp, ch 1) 4 times, working up Rnds in same ch-1 sps, (sc in next ch-1 sp, ch 1) 4 times; rep from * around; join with sl st to first sc. Finish off and weave in ends.
RING HANGER
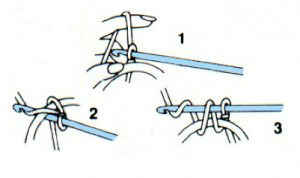
Using Ring, following diagrams below, join Yellow with sc to Ring, sc in ring until Ring is covered; join with sl st to first sc. Finish off and weave in ends.
All Rights Reserved ©2010 Maggie Weldon
Enjoy,
Maggie




I have bought alot of these at flea markets old ones. Now I can make one myself. Thank you Eileen
These remind me of those my Grandmother made when I was growing up. She taught me to crochet before I was in school.
Thanks, Maggie.
Lisa in Alabama