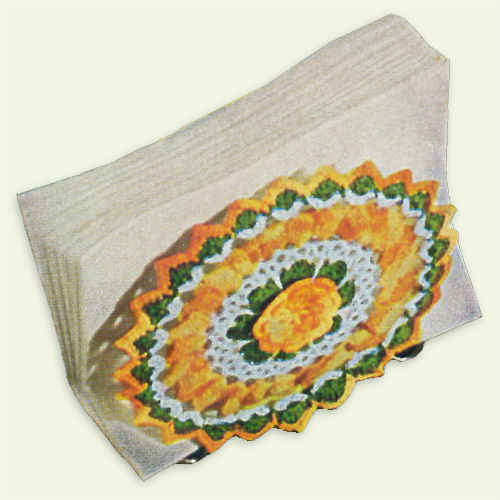
Years ago they crafted napkin holder crochet designs like these using a wire frame. Today these wire frames are no longer available but the design can still be used. If you crochet a solid double crochet circle to match the size of this rose design and sew it to the back you would have a beautiful potholder or hot mat. This rose design could also be used as a small doily or cover on a jar of jam or preserves to create a gorgeous gift.
Ruffled Rose Napkin Holder
FP249
Edited By: Maggie Weldon
Copyright 2010 Maggie Weldon
Skill: Intermediate
Size: About 5 inches in diameter.
Materials: Size 10 Crochet Thread: White, Green, and Shaded Yellows
Crochet Hook: Steel size 6 or 7 (1.80 or 1.65 mm)
JOINING WITH SC
When instructed to join with sc, begin with sl knot on hook, insert hook in st or sp indicated, yo and pull up a loop, yo and draw through both loops on hook.
Special Stitches
Shell1: (Dc, ch 3, dc) in same st or sp indicated.
Shell2: (2 dc, ch 3, 2 dc) in same st or sp indicated.
Shell3: (2 dc, ch 2, 2 dc) in same st or sp indicated.
Shell4: (3 dc, ch 2, 3 dc) in same st or sp indicated.
SIDES (Make 2)
Rnd 1: (Right Side) Starting at center, with Shaded Yellows, ch 5, join with sl st to first st to form ring; ch 5 (counts as first dc and ch 2), * dc in ring, ch 2; rep from * 6 times; join with sl st to first dc. (8 dc, 8 ch-2 sps)
Rnd 2: Sl st to ch-2 sp, ch 1, (sc, 5 dc, sc) in same sp, * (sc, 5 dc, sc) in next sp; rep from * around; join with sl st to first sc. (8 petals)
Rnd 3: * Ch 5, working behind petals, sl st between next 2 petals; rep from * around. (8 ch-5 sps)
Rnd 4: * (Sc, 7 dc, sc) in next ch-5 sp; rep from * around. (8 petals)
Rnd 5: * Ch 6, working behind petals, sl st between next 2 petals; rep from * around. Finish off Shaded Yellow and weave in ends.
Rnd 6: With right side facing, join Green with sl st to any ch-6 sp, (sc, dc, 7 tr, dc, sc) in same sp; * (sc, dc, 7 tr, dc, sc) in next sp; rep from * around; join.
(8 Leaves) Finish off Green and weave in ends.
Rnd 7: With right side facing, join White with sc to 2nd tr of any Leaf, ch 5, skip 3 tr, sc in next tr, * ch 3, tr between Leaves, ch 3, sc in next tr; rep from * around, ending with ch 3, tr between Leaves, ch 3; join.
Rnd 8: Sl st in ch-3 sp, ch 6 (counts as first dc and ch 3), dc in same sp, (Shell1 in next sp) around; join with sl st to first dc.
Rnd 9: Sl st in center of Shell, * ch 6, sc in center of next Shell; rep from * around. Finish off White and weave in ends.
Rnd 10: With right side facing, join Shaded Yellows with sl st to any ch-6 sp, ch 3 (counts as first dc now and throughout), (4 dc, ch 3, 5 dc) in same sp, * (5 dc, ch 3. 5 dc in next sp; rep from * around; join.
Rnd 11: Ch 3, (dc in next dc) around, working Shell2 in each ch-3 sp; join. Finish off Shaded Yellows and weave in ends.
Rnd 12: With right side facing, join White with sl st to ch-3 sp at point, ch 3, (dc, ch 2, 2dc) in same sp, * ch 1, Shell3 in next ch-3 sp; rep from * around; ch 1, join. Finish off White and weave in ends.
Rnd 13: With right side facing, join Green with sl st to any ch-2 sp, ch 3, (2 dc, ch 2, 3 dc) in same sp, ch 1, sc in the ch-1 sp between Shells, * ch 1, Shell 4 in next Shell, ch 1, sc in the ch- 1 sp between shells; rep from * around, ch 1; join. Finish off Green and weave in ends.
Rnd 14: With right side facing, join Shaded Yellows with sl st to any sc, * ch 1, sc in next 3 dc of next Shell, (sc, ch 3, sc) in center of same Shell, sc in next 3 dc of same Shell, ch 1, sc in next sc; rep from * around; join. Finish off and weave in ends.
CASING
Row 1: With wrong side facing, join White with sl st between Shells of 12th round, * ch 7, sc in the ch-1 sp between next 2 Shells; rep from * to within last 6 Shells. Leave remaining sts unworked.
Row 2: Turn, sl st to center of ch-7 sp, * ch 7, sc in next sp; rep from * across.
Row 3: Turn, sl st to center of ch-7 sp, * ch 5, sc in next sp; rep from * across. Finish off and weave in ends.
– Repeat for second side.
– Slip sides of Napkin Holder into Casings of both Sides.
All Rights Reserved ©2010 Maggie Weldon
Enjoy,
Maggie



Hi Maggie,
What fond memories this pattern brings back. I made many for friends and family over the years. Only wish there were a source for the holder once again. Thanks for sharing it again.
Chris Matthews
maybe old used CD’s would work as fillers….
I’m so happy to find this pattern! A few years ago I found one of these napkin holders at a flea market and grabbed it up! The cover is stained but in pretty good shape. I have been looking for the pattern so I could make another cover for the wire holder.
Thanks for posting this!!
I really appreciate this since I have the large round pattern and the oval pattern. Thank you so much.
Betty
I really appreciate this since I have the large round pattern and the oval pattern. Thank you so much.
Betty
I used my scroll saw and 1/8″ baltic to make a ring and a piece for a stand. Looks beautiful.
I used my scroll saw and 1/8″ baltic to make a ring and a piece for a stand. Looks beautiful.
I would love to get the oval and large round patterns. My grandmother made these all the time