Area rugs are very desirable items to own for all rooms in your home. These handy throw rugs offer helpful protection to hardwood floors and wall-to-wall carpets in heavily used locations.
Store bought rugs can often be expensive. Creating your own rug is not only relaxing and gratifying, but it can also save you money.
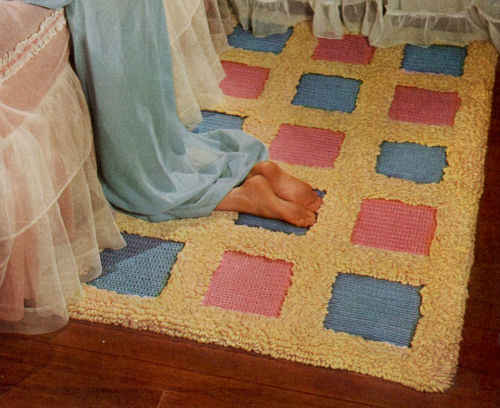
Blue & Pink Block Rug
FP263
Edited By: Maggie Weldon
Copyright 2010 Maggie Weldon
Skill: Easy
Size: About 33” by 56”
Materials: AMERICAN THREAD COMPANY “AUNT LYDIA’S” HEAVY RUG YARN: 24 skeins Cream, 7 skeins Pink, 8 skeins Light Blue; Yarn Needle.
Crochet Hook: Size H-8 (5.00 mm) or size needed to obtain gauge.
Gauge: Each square measures about 10½ inches.
Special Stitches
Loop Stitch (lp st):
Loop stitch is a variation of single crochet and is usually worked on ‘wrong side’ rows because the loops form at the back of the fabric.
Insert hook through lps on finger following direction indicated by arrow (see Fig. 1), being careful to hook all loops (see Fig. 2), draw through st pulling each lp to measure approximately 1”, remove finger from lp, yo and draw through all lps on hook.
SQUARES (Make 8 Blue & 7 Pink)
Row 1: (Right Side) With color yarn, ch 26, sc in 2nd ch from hook, (sc in next ch) across. (25 sc)
Rows 2-26: Ch 1, turn, sc in each sc across.
Rnd 27: Ch 1, turn, sc in each sc across, * working in sides of rows, 3 sc in first row, sc in next 25 rows, 3 sc in last row *; working in unused lps of starting ch, sc in next 25 ch, rep from * to *; join with sl st to first sc. (112 sc) Finish off and weave in ends.
Edging
Rnd 1: With wrong side facing, join Cream with sl st to any sc, lp-st in each sc around, working 3 lp-sts in center sc at each corner; join.
Rnds 2-3: Ch 1, lp-st in each lp-st around, working 3 lp-sts at each corner; join.
Rnd 4: Ch 1, lp-st in each lp-st around, working (lp-st, ch 1, lp-st) in each corner; join. Finish off and weave in ends.
Assembly – use photo as guide
– Sew squares together – 3 blocks by 5 blocks, having a Blue square in each of the 4 corners.
Border
Rnd 1: With wrong side facing, join Cream with sl st to any lp-st of Rnd 4, lp-st in each lp-st around, working (lp-st, ch 1, lp-st) in each of the 4 corner ch-1 sps; join.
Rnds 2-4: Ch 1, lp-st in each lp-st around, working (lp-st, ch 1, lp-st) in each corner ch-1 sp; join. Finish off and weave in ends.
All Rights Reserved ©2010 Maggie Weldon
Enjoy,
Maggie


Dear Maggie,
thank you for sharing this beautiful Pattern!
Have a nice Week and send you many Greetings,
Marion
Hi Marion,
If you make it post a picture on Facebook. I love to see what everyone makes.
Happy Holidays,
Maggie