The bedroom and bathroom are the most intimate areas of the home. Here, dreams are nurtured, beauty enhanced and a steaming scented bath beckons to soothe away the stresses of the day. Romanticism rules this retreat and little luxuries abound, with fabulous embellishments of handmade crochet. Enhance the beauty of your home with a new throw rug that you have created. Whether you are stepping out of the shower or out of beg your feet will be happier when they hit a warm, comforting floor.
Crochet this rug with worsted weight yarn, in a multitude of colors to match any room decor in your home.
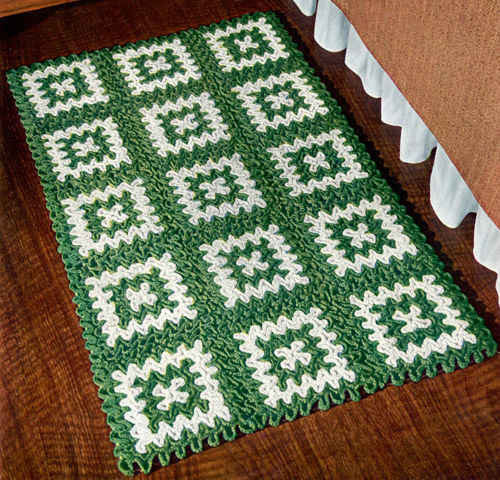
Green & White Rug
FP261
Edited By: Maggie Weldon
Copyright 2010 Maggie Weldon
Skill: Easy
Size: About 23 inches by 37½ inches
Materials: Sport Weight Yarn: 16 oz White and 15 oz Dark Green.
Crochet Hook: Size D-3 (3.25 mm).
Gauge: Each square measures 7½” by 7½”.
JOINING WITH SC
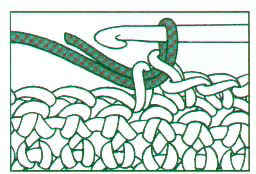
When instructed to join with sc, begin with sl knot on hook, insert hook in st or sp indicated, yo and pull up a loop, yo and draw through both loops on hook.
TO CHANGE COLORS
Work last stitch before color change to last step, with new color yo and pull new color through remaining loops on hook. Drop unused color to wrong side. Do not work over unused color.

*For Further Assistance with Changing Colors, see our Help Section on the Website www.MaggiesCrochet.com
MESH SQUARES (Make 15)
Row 1: (Right Side) Starting at bottom, with White, ch 50, dc in 8th st from hook, * ch 2, skip next 2 ch, dc in next ch; rep from * across. (15 meshes)
Row 2: Ch 5 (counts as first dc and ch 2, now and throughout), turn, dc in next dc, * ch 2, dc in next dc; rep from * across.
Rows 3-15: Ch 5, turn, dc in next dc, * ch 2, dc in next dc; rep from * across.
At the end of Row 15, Finish off and weave in ends.
Rnd 1: With right side facing, join Green with sl st to upper right hand corner mesh of outer row of Mesh Square, ch 3 (counts as first dc), 5 dc in same mesh, * working downward, 3 dc over next post, working across, work 3 dc over top of next mesh of previous row, working upward, 3 dc over next post, working across, work 3 dc over top of next mesh; rep from * to 2nd mesh before corner, working downward, 3 dc over next post, working across, 3 dc over top of next mesh, working upward, 3 dc over next post, work 6 dc in corner mesh; repeat from 1st * all around, ending to correspond; join with sl st to first dc. Finish off and weave in ends.
Rnd 2: With right side facing, join Green with sl st to post on left hand side of corner mesh of next free round, ch 3 (counts as first dc), working upward, 2 dc over post, * working across, 3 dc over next free post of same round, working downward, 3 dc over next post, working across, 3 dc over next post, working upward. 3 dc over next post; rep from * to mesh before corner mesh, working across, 3 dc over next free post, working downward, 3 dc over next post of corner mesh, working upward, 3 dc over next post of same mesh; rep from 1st * all around, ending to correspond; join with sl st to first dc. Finish off and weave in ends.
Rnd 3: With right side facing, join Green with sl st to post on right hand side of any corner mesh of next free row, ch 3 (counts as first dc), working upward, 2 dc over post, ** working across, 3 dc over next free post of same mesh, * working downward, 3 dc over next post, working across, 3 dc over next free post. working upward, 3 dc over next post, working across, 3 dc over next free post; rep from * to corner mesh, repeat from ** all around, ending to correspond; join with sl st to first dc. Finish off and weave in ends.
Repeat the last 2 rounds working in same manner until all meshes are worked, working 1 more round White (Rnd 4), 2 rounds Green (Rnd 5 & 6), 1 round White (Rnd 7). Work 14 more squares in same manner. Sew squares together as illustrated.
All Rights Reserved ©2010 Maggie Weldon
Enjoy,
Maggie


Such a pretty pattern! I’ve been looking for a rug pattern to make some matching rugs for my kitchen. The end of the pattern says to sew the squares together as illustrated. Could you point me to that illustration, please?
Thank you for sharing this pattern!
oops – I think it means as pictured – I was thinking there was a special way to sew them together – with a particular stitch. So just assemble the squares with the standard whipstitch? Sorry!!
Lindo el tapete y lo mejor de todo que lo haces facil.
Muchas gracias Maggie.
Un gran abrazo y buen domingo.
nice rug
This is a beautiful pattern, thank you. I’m not sure I have the endurance to make the rug but the individual square will make a spectacular hotpad, maaybe worsted weight with a G or H hook. What a great stash buster!